![]()
Post Holes
Post holes that succumb to a post
A post that is in need of a hole.
Setting Fence Posts–Addressing the Weakest Link
There is an appealing simplicity to setting fence posts; digging a post hole is a manly occupation, reminiscent of splitting logs. The pure physical exertion of both are drawn back to the Boy Scouts or the YMCA with the belief in good character born from hard physical activity. So why is it that spending an entire day, several days, setting fence posts, digging holes, brings out in us something less than character? Something closer to the sing-song string of four letter words wailed out to the neighborhood in anger and frustration while struggling with thick sticky clay or webs of tree roots or chunks of shale and rock or, God forbid, that hollow clink of having cracked the ceramic housing of the main water line.
If our post holes were excavated in nothing more than clean black dirt it would be all the things we anticipated when deciding to dig those fence posts in the first place. The stamina of pure physical exertion, working down the line one hole at a time as if we were mowing the lawn; what we’ve accomplished and what we haven’t is clearly identified.
When you encounter those holes with the obstructions mentioned above, you have a few options. Other than shrugging and deciding that the hole is in fact deep enough–when it clearly is not. You can rent an auger, managed normally by two men. In some cases this will help work through clay and small stones. But it will be ineffective against larger rock and if encountering roots, there is the danger of the auger yanking free of even the tightest grips.
You can work the obstructions with a long iron digging bar, driving it into the bottom of the hole repeatedly, working it loose and returning to the hand posthole digger for a few more inches progress.
You can rent a jack hammer with a spade chisel bit. To the depth of the chisel bit, and then you’re back to the digging bar. You might also want to be cautious of the bit lodging itself in clay or root and the precarious wear on a bent back, working the bit free with a dead pull that might likely leave you laid up with spasms for days to come.
You can employ a sawzall with a long 8″ tree bit and, for roots, cut them at the circumference of the hole.
You can pour a little water in the hole and as it soaks the soil loose, move on to the next hole.
You can hire a tractor with a backhoe auger and assuming the site is accessible, easily accomplish the project without breaking a sweat.
You can hire laborers lingering along the curb at the local lumber yard and with oversight and a clear layout of strings and stakes, go take a nap and return now and again to inspect their progress of setting your fence posts that might likely be about as straight as the squalls of a January storm in the north Atlantic.
But the post holes must be dug. And at the proscribed depth and to allow for the drainage bed of pea gravel and if you slight this rule, you will have a fence-line that wobbles and zags and if a fence has one guiding principle, one Zen-like dictum, it is to adhere to the straight and true line.
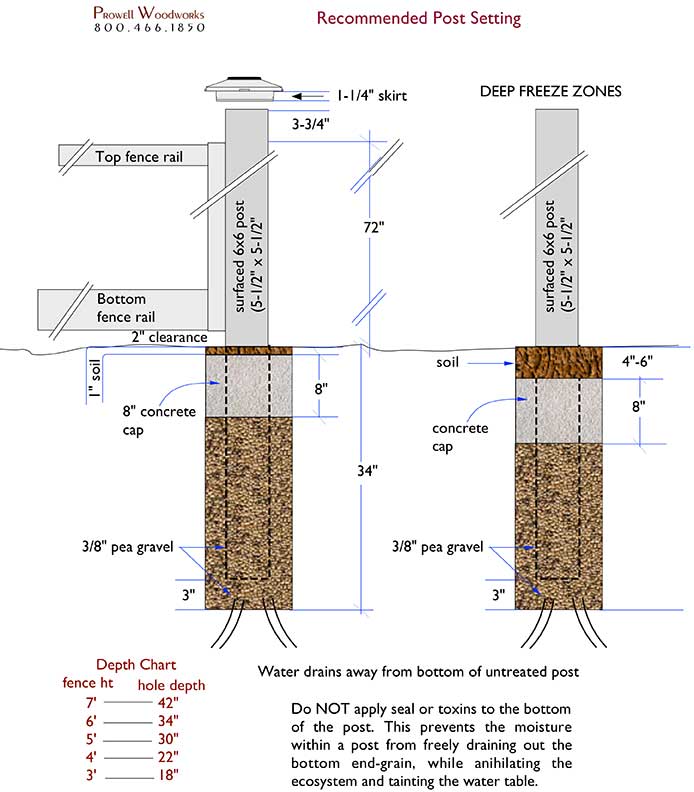
Purchasing a Prowell garden gate or fence-line can represent an investment of some stature. We need to take a moment to discuss the best procedure for setting those posts, whether the actual holes are dug by hand or by a rented auger, insuring this component of the project does not become your weak link in the years to come. Following the technique below for setting fence posts without concrete will make a difference of several decades in the lifetime of the post. This method is the result of four decades of experience, setting over 10,000 posts. Western cedar posts, comprising a fairly significant investment and given their best behavior resting along the guidelines below, will nevertheless give way in 30 years or so to a second generation of posts, and a third . . . all of them subservient to a Prowell fence, to the everlasting phenomenon of something designed and built with the compliance of an eastern temple. A temple that will outlast your posts, outlast you, outlast your children!
Below, a recommended fence post depth chart:
| Fence Height | Post Depth |
|---|---|
| 7-ft | 42″ |
| 6-ft | 36″ |
| 5-ft | 32″ |
| 4-ft | 24″ |
| 3-ft | 18″ |
SETTING FENCE POSTS
The logic is simple.
Bacteria and fungus thrive within the soil, and in areas where there is no light or air movement (particularly when the climate is warm and the air is moist). We are looking to separate the bottom of the post from the soil for this reason, as well as to create a natural drainage of the standing water that can result from surface rains and snow melts, as well as air-moisture such as fog and mist and humidity.
In the warmer, dryer seasons, the post shrinks and a small crack appears between the post and concrete. With posts set in full concrete, water and moisture find their way down through this crack and begins to fester immediately in an environment without light or air. If it drains clear to the bottom, only to settle at the bottom of a post set on grade, we are essentially hand-feeding the bacteria with an ideal breeding ground.
We might also make note that there exists a hierarchy of vulnerability to this bacterial dragon. If you are in the temperate climate of the Pacific coast, the parasite population is minimal and unaccountable compared to areas such as, say, South Carolina or Southern Florida, or Hawaii, or the Caribbean, where bacteria and fungus are merely waiting for the day when humans become extinct and the earth is returned to its rightful species.
In other words, warm fetid climates are more prone to wood rot than temperate climates. To the infestation of bacteria and fungus and an Eco system that brims with insects such as termites–ground and subterranean (as opposed to the drywood variety who colonize within the cellulose of your above-grade framing). And how do you prevent your posts from becoming fodder for such a colony? First, do not use the popular application of a liquid termiticide, carpet-bombing your soil and water-table with the same approach today’s AMA takes in treating cancer by bombing the system with radiation and chemotherapy in an end-run toward the survival of the fitness–the cancer or the patient. Your soil will suffer, as will the potable levels of your ground water and every other species contributing to that thriving ecosystem beyond the pesky termite.
Fortunately, even subterranean termites have dietary preferences and limitations, and the cellulose, or fiber, of Western Cedar is inherent with the genetic tannins, or oils, that act as the ultimate defense mechanism. But not so much that you can taunt mother nature; you must follow the suggested guidelines in setting your posts, and never, never, set an untreated end-grain directly onto the dirt for the simple reason that with prolonged droughts of several years, termites will abandon their insulated subterranean tunnels and in an act of desperation, go after a cedar fiber the way an adrift sailor might consider drinking salt water from the sea.
You must create a bed of drainage at the bottom of the post that is 3″ deep and made up of 3/8″ pea gravel (larger aggregate will not settle as well and the post, set on top of this, will ultimately shift as the larger gravel shifts over time).
Set the post in place and fill the hole 2/3rds it depth with more 3/8″ pea gravel. At the top, pour a washer, or cap, of concrete that is approximately 8″ thick. The water that finds it way between the shrinking post and the concrete will drain through the 8″ cap of concrete and into the pea gravel where it carries on the length of the post and into the bed of 3″ pea gravel, AWAY from the bottom of the post. For this reason, do not seal the bottom end-grain of the post; it must be allowed to drain out any moisture the post absorbs from rain and humidity and dew and fog. Particularly true of green posts that are not air dried. There is also no reason for you to poison the ground with toxic preservatives that will take decades to dilute to a safe level. Do you assume that the earth is yours and yours alone and that no one has inhabited this earth before you and that no one will inhabit this earth for a millennium to come? Just avoid the damn poisons.
For Gate Hinge Posts:
Because this post carries the load of the gate and the added stress of a swinging gate, it’s best to set the post in full concrete. But not forgetting the 3″ bed of pea gravel at the bottom. Water drains down the length of the post between the shrinking post and the concrete and carries on a little further to finally drain away from the exposed and vulnerable end-grain.
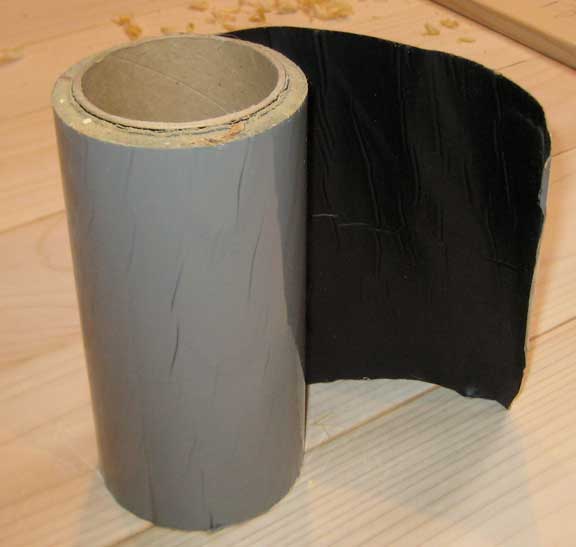
At the grade level, extending from approximately 1″ above the concrete, introduce the exterior weatherizing tape known as Vitchithane, or any number of names. It is a thick gray tape in 4″and 8″ wide rolls with a thin film on the back that peels away for a uncommonly sticky surface. A permanently sticky surface. This is designed to create an impermeable seal. The only product that will do as much. The impermeable seal is the top priority; if moisture finds it’s way between the tape and the post, we are again creating an area without light or air-flow and back to breeding bacteria.
For this reason, taping the length of the post is precarious, only because if in fact you do not show care in insuring the tape is applied properly and providing a sure bond, then we are facilitating the bacteria and shortening the life of the post. The moisture that gathers between the post and the tape will have no where to go, festering in a perfect environment of no light and no air. So, although it is an acceptable allowance to tape the post for only one course of tape, at the concrete line, it is not advisable to tape the full post from the grade down. So, to repeat, do not tape the entire post from the grade down. Tape only that portion where the concrete cap extends to.
Once again, refrain from sealing the bottom end grain of the post or using preservatives. Any moisture the posts absorbs above grade, will then be unable to drain away through the bottom of the post, in addition to the moisture content inherent in the post at the time of setting.
Freeze Areas
For areas of deep freezing, it’s always best to set your concrete cap a little deeper into the grade and to increase the thickness of the concrete proportionate to the freeze-line. In other words, the top of the cap in Chicago would be 1-2″ below the grade and run about 10″ thick, or deep. In Michigan’s Upper Peninsula, the cap would set 2-3″ below the grade and run even deeper. Why? Cold, freezing conditions are going to contract and swell the soil so that it compresses the concrete and with nowhere to go, the concrete will work it’s way up the post hole in the same manner as one of those Popsicle push sticks.
* Remember to fill that cavity from the top of the concrete to the grade level with 3/8″ pee gravel. Larger aggregate is not advisable; due to it’s irregular, hard-edged shape, it will settle and find its final level over a period of months and the result is a post that is suspended above the settled aggregate. The 3/8″ pea gravel is rounded and smooth and settles instantly, without the cavities or voids of larger gravel or rock. It does not require tamping.

![]()
Weatherizing tape is often suggested as an added seal. An insurance, of sorts, furthering Prowell’s methodology. Weatherizing tape is commonly used in construction when a wood member is buttressed against a non-wood, non-breathing material such as masonry. It prevents the proliferation of decay in an area without light or air flow.
But our posts are not in contact with any masonry or non-breathing material other than the top concrete washer, or cap. A cap that will contract in the dry weather, along with a post that also contracts to create an opening between post and concrete cap that will allow the water and moisture to drain beyond the depth of the cap and into the freer drainage of the pea gravel. Not the case in a home construction where we’ll see weatherizing tape employed on the window framing of a stucco-clad veneer.
Caution: The idea, proffered largely by contractors, is to tape the entire post below grade, and thereby create an impermeable seal from the moisture and thereby protect the post. While in theory it sounds like solid advise, we must realize that 99% of fence posts are green wood, as opposed to air-fried or kiln-dried. Green 6×6 posts are in the range of 17%-25% moisture. Once set, the posts, like firewood, will begin to season and gradually dry out. But at the time when the weatherizing tape is applied, the posts are green, which can affect the adhesion of the tape as the moisture evaporates. The effectiveness of the tape is limited entirely to its seal against the post. If used, be sure that seal is complete, without any folds or areas where humidity, dew, rain, etc can enter that cavity between the tape and the post. To insure we have drainage in the event of a leaky sealed tape, apply it only where the top concrete cap is, plus 1/2″+/- above the cap.
The same principle applies to retaining walls lined with a moisture barrier between the wood wall and the dirt. Moisture–as in dew or humidity or even rainfall–finds its way between the moisture barrier and the wood and because of a lack of air flow and light, and coupled with warm climates, the decay process is actually expedited.
It’s a principle that unfortunately was played out in home construction for so many decades. Stud walls sheathed in code-required shear ply to provide lateral rigidity and then wrapped, or sealed, in a purported moisture barrier. In the 1950’s and 60’s this was plain old tar paper. In the 70’s and 80’s it was TVEK. What was ignored, since the building codes mandated these vapor barriers following the war, was how a house must breath, expanding and contracting with the seasons and when moisture finds its way between the seal barrier, be it TVEK or tar paper, and the plywood shearing, we have the exact same problem as described repeatedly above. The result: Rotted framing. There is nothing more healthy than to spend the night in a house built before 1946, and lay awake listening to that house talk–creaking and groaning and breathing. This is a house that will last.
Use of the weatherizing tape shown below will shorten the life of your post when the entire post is wrapped if the seal on the tape is compromised. It can provide safe insurance if, as described in the section above, the tape extends only as deep as the washer/cap of concrete (8″+_) Without the weathering tape and by following the primary procedure, your post will still last 40+ years. Far longer than the adhesive life of the tape when buried below grade and in full contact with the soil.

![]()
SELECTING THE RIGHT MATERIAL
Excellent rot resistance and representing the best option. Clear western cedar is certainly the most visibly pleasing among all choices. Approx. $24+/ft for surfaced 6×6 (5-1/2″ x 5-1/2″)–. depending on your local lumber yard. Normally a special order in the west of about 1 week. This can often be 2 weeks back east. Seldom a wise choice for an entire fence-line and used primarily to shoulder your Gate, or an assembly of the gate and flanking panels representing a featured entry. Sustain-ably
harvested in British Columbia.
Note: Northeastern
For those in the northeast corner of the country, Western red Cedar posts may be sourced through
Taylor Forest Supply. 765 Washington St, Pembroke, MA 02359 (781-829-2121
Liberty Cedar. 325 Liberty Ln, West Kingston, RI 02892 (401-789-6626)
Reader’s Hardwood Supply. 250 Cape Hwy Unit 9, East Taunton, MA 02718 ( (508) 301-3206)
Note: HAWAII
For our Hawaii patrons, clear or knotty posts can be sourced through
Hardware Hawaii in Kailua. 30 Kihapai St, Kailua, HI 96734 (808-266-1133)
Approximately 4 weeks.
(Or larger orders shipped to Hawaii at a better price through: LS Cedar on Vashon Island, Washington.
SOUTHERN CALIFORNIA:
Ganahl Lumber (multiple locations)
SAN FRANCISCO BAY AREA:
Moore Newton, San Leandro
Golden State Lumber, San Rafael
The Lumber Baron, Albany
*Posts can be a ‘green’ grade (not kiln-dried). Extended fencelines will normally opt for STK grade (knotty), with the clear grade relegated for the gates.
Knotty Western Cedar (STK)
![]()
Equally excellent rot resistance properties and the preferred choice for extended fence-lines. Cedar knotty grade (STK) is approximately 1/2rd the cost of clear and normally with an Architectural Grade of only a few select knots (cedar tree limbs, the source of knots, are sparse and spindly). Sustain-ably harvested in British Columbia. In stock at most yards in the west, and a 2 week special order in the east.
Southern Cypress
![]()
Nominal rot resistance. Higher density than cedar or redwood. Sustain-ably harvested only in the SE United States. Available from Texas to Florida, and from Florida to NC. These just happen to represent areas with high humidity and the ideal conditions for breeding bacteria and fungus and although Cypress has the benefit of being harvested locally, it is not an ideal choice in its own backyard. A cypress post in Alabama will host an ecosystem of bacteria within months of being set to grade.
Con heart Surfaced Redwood
![]()
Redwoods grow in northern California, where Charles and Ben live. Many of them in his neighborhood are more than 2,000 years old, including perhaps the one sidled along the west wall of the original shop in Sebastopol. Redwood harvests to an acceptably mature fiber in about 150 years. The redwood available today is harvested in 30 year cycles with the result being a porous, fibrous property with excessive sap that is a distant cousin to the fully matured tree. The natural tannins inherent to redwood–it’s greatest asset and giving it the resistance to fungus and rot–are a full 70 years away from fully maturing, with the result that it is far more susceptible to bacteria than the redwood of legend. We would suggest that no one use this species for anything whatsoever beyond the appreciation of their forested existence.
Clear All-Heart Surfaced Redwood
![]()
Clear all-heart surfaced redwood suffers from the same premature harvesting faults as described above. The difference is that it is clear of knots. An even greater offense. At one time, 30 years ago, clear-all-heart represented the heart of an old-growth tree, with the tightest grain and oldest growth rings reminiscent of the grove where Charles once proposed to his wife–those ancient living Goliaths, alive during the march of Cortez and the Crusades and Caesar’s Rome, are mostly gone and their off-spring rarely outlive pubescence. Just forget about redwood Fence Posts.
You are skeptical of the above assertions on redwood? Take a drive to your local lumber yard and for fun, have a look at the end-grain of a redwood post. Count the growth-rings per inch. Then have a look at the western cedar. Count those. Your proof involves a short drive to the nearest lumber yard.
Old Growth Recycled Redwood
![]()
When available, this is an excellent choice. More commonly utilized for other uses than posts, simply because the availability is due to dismantled structures. In other words, you must locate 4×4 or 6×6 dimensions. There are several suppliers dealing in recycled Old growth in California and Oregon, drawn mostly from the dismantling of closing Army and Navy bases. The price varies widely. This is obviously more difficult to secure back east, where such bases were built largely out of local indigenous species.
*Note: Recycled redwood often includes hidden, embedded nails that splinter out against a tablesaw blade and can be extremely dangerous. Check every board with a metal detector before cutting.
Synthetic (Trex, etc)
![]()
Fiber, or Synthetic Composite Fence Posts are not as structurally rigid as wood, therefore 4×4 fiber posts should not be used for Fences over 4-ft ht. Fiber posts can be finished with solid-body stains or even painted. Unavailable as 6×6.
Eastern White Cedar
![]()
Good rot resistance. Not excellent, but good. Available for those in the NE. 4×4 approximately $3/ft linear. Light knots.
Eastern Red Cedar
![]()
Moderate rot resistance. Aromatic. Available as 4×4 and 6×6. 6×6 Approximately $4-$6 a foot with light knots.
Presuure-Treated Fir or
Pressure-Treated Southern Pine
![]()
Pressure-treated lumber as a Fence Post is a last resort. Unfortunately, because of it’s availability and low cost, a common one.
On four levels:
- It is not biodegradable and regardless of what you’ve read or what your lumber salesmen tells you, the toxic poisons cured into the wood are not friendly to the touch (Many state codes now outlaw the use of pressure-treated lumber in public parks and schools for above-grade exposure). It also drains into the water table and contaminates not only your drinking water and edible garden, but a mild annihilation of the surrounding ecosystem.
- Prowell’s gates and fence panels are going to incite fondling, while the pressure-treated posts will enact the very opposite reaction.
- The vacuum-pressured system of penetrating the toxin into the post extends approximately 1/4″ only. The end-grain, or bottom of the post, is exposed, raw fiber.
- Most pressure-treated posts are Douglas Fir. Fir is plentiful and affordable, and yet it is like a smorgasbord to bacteria. A sweet, delicious fiber languishing just beyond a thin barrier of poison. Particularly the untreated end grains that are set into the grade. If you treat the end-cuts with a liquid poison such as Copper Green, you are only exasperating the damaging infiltration of the water table. If you seal the end-grains, with anything, you are impeding the ability for the post to drain through the bottom end-grai.
EXPOSED POST END-GRAIN
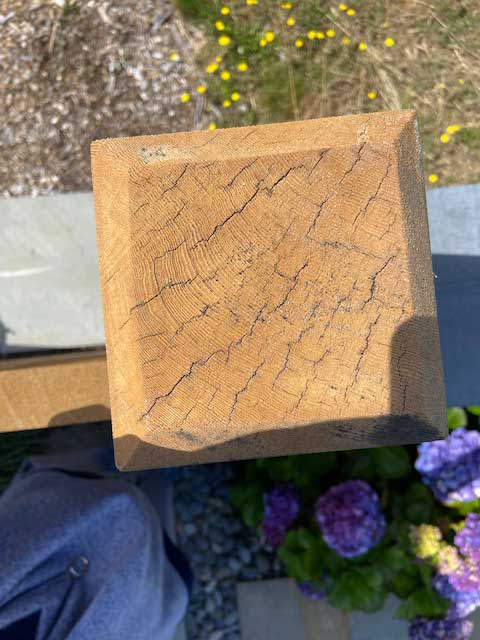
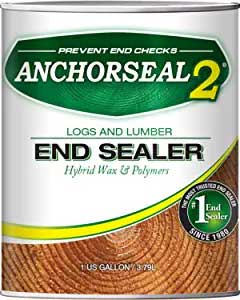
With end-grains exposed to the element, 6×6 posts will often show cracks and checks as it absorbs the dew, fog, rain, and humidity. To help prevent this, seal the ends of your posts with Emulsified Liquid wax. A clear absorbing end-grain sealer. A good idea where you have post caps or exposed end-grain.

Liquid Emulsified wax
AnchorSeal End-grain sealer.

>>To PROWELL WOODWORKS HOME
>>BACK TO SPECIFICATIONS
The Designs of Prowell Woodworks are protected by Patents and Patents Pending.
