
![]()
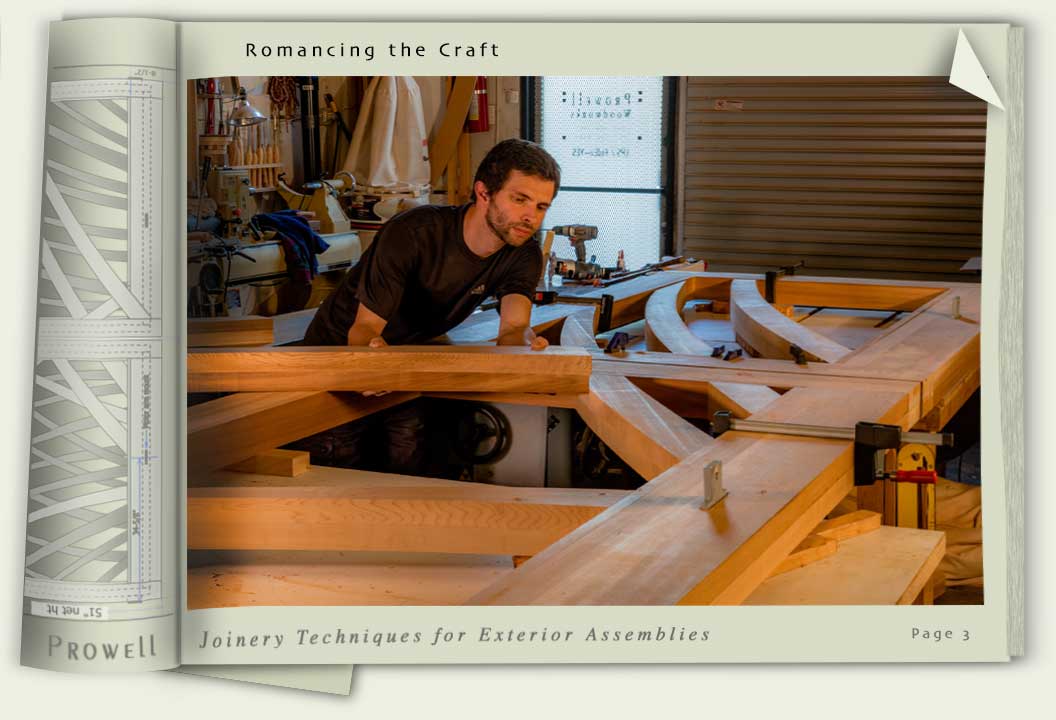
A Word on Woodworking Joinery Techniques for Exterior Wood Assemblies

Charles Prowell’s articles on Joinery have appeared in Fine Woodworking,
Fine Homebuilding, Woodwork, Old House Journal, and This Old House,
among others.
There are those among you who are drawn more to the art of Joinery than the actual completion of any work. And most certainly the design of any given endeavor. You are culled by both the engineering of this calling, and the general physics of its logic. You are in fact aspiring engineers at heart with a weakness for poetry and a pair of restless hands acting on orders from a mind obsessed with innovation. So let’s take a look at what makes you tick.
There are three basic principles to the success of a joined, exterior assembly.
1) Joinery. Utilizing the best joint for the right application.
2) Design. Understanding what happens with 360 degrees of exposure to various climates from San Diego to Buffalo.
3) Wood. The correct species, and just as important, the grade of that species.(see A Word About Wood)
In this article, we’ll focus on #1. Joinery.
By Joined Exterior Assemblies, we’re referring to just about anything that is fully exposed to the weather and is not based on a methodology of metal fasteners. This might include traditional post-and-lintel timber framing associated with the New England barn-raisers, as well as Japanese and eastern temples, but more so the host of those landscape furnishings such as gates, fences, arbors, pergolas, benches, swings, post caps, and even our lighted columns.
What it does not include are the more common productions designed and built as a series of mounting layers: Wood siding mounted to side-wall framing; deck boards mounted to joists; fence boards mounted to exposed frames; arbors and pergolas stacked like erector sets; diagonal bracing and supporting corbels. All of them fixed in place with brackets, bolts, screws, nails, staples, or the compressed air of a nail gun.
There is no default joint. No universal solution to all the applications of all 650 various products offered by Prowell Woodworks. If you are a writer and expect someday to pen a timeless cultural classic, you are limited in part by your command of the language. The actual vehicle one would hope you have mastered long before you sit down to that first sentence of your magnum opus. Learning the appeal and usefulness of the basic dozen or so joints expands the parameters of what can subsequently be designed. Learning to invent and modify known joints toward your own application expands those possibilities even further.
So let’s have a look at a hierarchy of joints, drawn from decades of indentured apprenticeship followed by decades of blissful preoccupation followed by old age. Some of the examples are common and recognizable, and some of them closer to performance art.
![]()
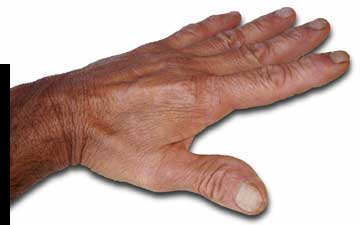
Let’s start with this. An image of Charles’ left hand. As a lefty, it’s a fairly important hand. And if you’ll notice, after some 50 years of cutting joints, all his fingers are in their proper, original place. On this, his left hand, as well as his right hand. Missing digits and surgically repaired digits are always the result of one of two factors:
#1) An increasingly hurried pace of work. (Learn to work at one pace, and only one pace, no matter the time of day or the urgency of a deadline. When they speak of Zen and the art of woodworking, it’s all about pace. Establishing your pace. Maintaining your pace. If you have a tight deadline, you simply work longer hours. Never work faster. Faster is foolish.
#2) Attempting a procedure that simply feels wrong. An odd cut or unorthodox approach alerted by your sixth sense. A warning you should heed. Stop, step away, and reconfigure how better to set up the procedure. Templates? Jigs? It’s the odd maneuver that often results in what we call a freak accident.
And yet you’re not accountants. Woodworking has some undeniable occupational hazards. Utilize what props you can to minimize accidents.
FOR THE TABLE SAW:
- Install a riser to thwart kickbacks.
- Use a push-stick to move stock through; Joint your edges for a straight-edge against the fence to prevent binding.
- Build a sled for safer crosscuts.
- Build an auxiliary fence with a clamp for vertical stock.
- Hose it up to either a large shop collection or a smaller dedicated portable collection, Click here
FOR THE MITER SAW:
- Build a hold-down stick for cutting smaller pieces.
- Install an aluminum slotted fence and clad it with a wood face and set the wood face to zero tolerance at the blade to prevent small pieces from flinging every which way–such as your eyeballs.
- Buy a small shop vac and hose it up to minimize the majority of this dust-bucket tool.
FOR THE JOINTER:
- Use push sticks and set the blade guard and fence so the knives are minimally exposed.
FOR THE BANDSAW:
- Set the blade for the minimum clearance required for a given cut. Create two push sticks and work the small shorter stock through with these to avoid the common tendency of your fingers working close to the blade.
CHISELS AND HAND PLANES:
- Neither of these tools are of any use unless they are razor sharp. They seem innocuous. Cute little thingies that cost a fortune, but unless they’re used with the correct ergonomics, accidents will result. Never, never have the non-wielding hand in front of the hand wielding the chisel. If you are holding your stock steady with this free hand, clamp the stock in place or use bench dogs and get that hand back where it belongs–behind the tool. If you don’t have the time for this, then you are breaking that rule regarding pace. The Zen-ness of pace.
* Are you having trouble maintaining a consistent metabolism throughout the day? Does the pace escalate as the day progressed due in part to what you hope to accomplish before day’s end, or in part because you simply get wound up? Try this: After lunch, lay down for 30 minutes every single day. You may say, ” Nah . . . naps are not for me.” But they work to regulate your pace. They stop the escalation and keep you on an even keel. And if you cannot actually sleep, allow your mind to wander in a light episode of daydreaming.
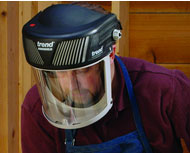
If you’re working regularly with Western Cedar, minimize the fine filament dust that results from this species. 15% of those working with this species develop an allergy that can result in serious pulmonary disease. Install an air filtration system to clear up much of the particle dust floating around your airspace. If you find you’re coughing regularly, in the shop and at home, bite the bullet and buy a Power Air Respirator, the only style dust mask that works. If you continue coughing, you have absolutely no choice but to stop your exposure to western cedar. Permanently. This is a game changer. A career shift. If you adjust your role from the shop floor to the office, the office cannot be in the same building. Your system has by now become far too sensitive to the aggravating chemistry of western cedar and any continued exposure whatsoever will trigger serious pulmonary consequences.
![]()
GATE JOINERY
Primary Stile-to-Rail Applications
#1—THE BUTT JOINT
A Gate illustrating Butt Joinery and diagonal bracing.
Fastened with nails or screws in a struggling effort to forestall the certainty of a gate’s gravity. The weight of the gate itself will eventually draw the nails or screws down and open their threaded hold and the looseness of the joint cannot be re-tightened at this juncture. The diagonal bracing is only as stable as the primary joint to which it is fastened to. A turnbuckle cable will help, but requires periodic adjustments and tightening. And yet the Butt Joint is a good joint. Ideal for framing residential walls, which are strengthened by sheer plys and joists and collar ties and rafters and a solid connection to a concrete foundation.
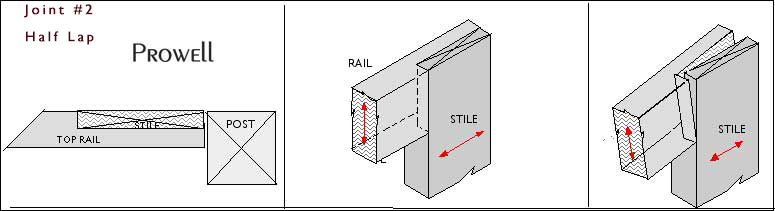
#2: HALF LAP JOINERY
Early on, while more or less still in test mode, this joint was utilized on all the Prowell gates, illustrated thoroughly in an article for Fine Homebuilding magazine. But we came to realize the limitations of the half-lap. In fact, every single procedure in that 1996 article has since been revised and improved.
Advantages:
- A fairly simple joint to fabricate, providing a large mating area, or what might be called the ‘glue-mass.’
Disadvantages:
- Wood breathes with the seasons. The red arrows indicates in what direction the wood will breath, expanding and contracting in wet and dry weather. This breathing occurs perpendicular to the direction of the wood grain. The stile, which is the vertical frame stock of the gate, breathes left and right, or horizontally. This is why there is a 3/8″ clearance configured between the net width of your gate and the post or jamb. Now . . .the rails, which are the horizontal stock between the stiles, is going to breath vertically, or perpendicular to the horizontal rail. In direct contrast to the stile’s movement. In furniture design, this is a principle that cannot be slighted, as the result can often lead to a tug of war that results in one of the two members suffering the severe damage of checks and fissures. Why? Because one of the two members is trying desperately to simply breath, which is it’s organic right, and yet it is being held in check by the half-lap of the corresponding member. The result, again, is stress. Stress is bad. Stress is at the root of not only schizophrenia and paranoia and a whole bevy of nervous disorders, but it can also result in this half-lap joint opening, loosening, and the opposing member checking and cracking just as a seemingly sane soul begins to slip from sanity.
- The second issue that arises with the half-lap joint is how the top of the joint is essentially exposed to the elements. This in itself is not the most favorable scenario. The vast majority of moisture absorption, resulting in undue expansion and contraction, is through the end-grain and if half of a vertically exposed joint is in fact end-grain, the expansion/contraction of that half of the joint will potentially open the joint with continued exposure to the gravity of rainfall, dew, fog, humidity, and of course sunlight. If end-grain is to be vertically exposed, it’s best that it not be an integral part of a joint ( Our own methodology allows both the top and bottom end-grains of the stiles to be exposed, but they are not configured as exposed joinery. The joint is recessed and hidden from the vulnerability of the exposed end-grain. ( Note: It should also be noted that wherever possible, exposed end-grains are far more stable if sealed with an emulsified liquid wax, with a lifeline that is 50 times that of an epoxy seal. And although such a seal may thwart the coverage of eventual stains and paints, the functionality of a stable end-grain leaves us debating the the hierarchy of functionality over aesthetics.)
- The third issue is that the top of the exposed half-lap joint has nothing to thwart it’s placement beyond the strength of the adhesives. As we see in the far right illustration, once the joint opens from the exposure to direct weather, then checks and cracks from the opposing grain directions, the rail begins to crack and check under the stress and drops, or sags, with nothing to prevent the lure of a beckoning gravity.
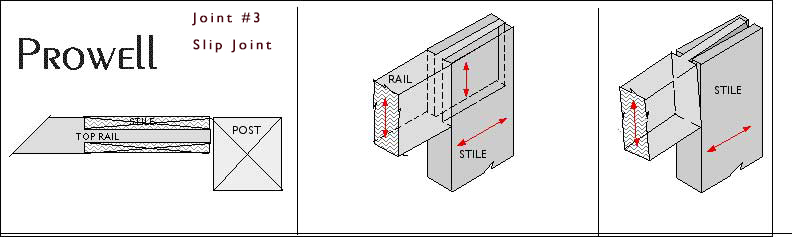
#3: OPEN THROUGH-TENON JOINERY (SLIP JOINT)
Click Here for further details and in-progress photos of Joint #3.
Here we double the glue mass, or mating surface, by having each side of the tenon, or male segment, mating to the inside surfaces of the milled stile. Assuming you are using the right glue, doubling glue mass is always good.
Advantages:
- Double the mating surface–an improvement over the half-lap.
- Moderately easy to fabricate.
Disadvantages:
- We have already covered the issues with grain direction and seasonal breathing, and this joint is not exempt from the faults discussed in the above example. Like furniture-making, dimensional changes are not pervasive, but if you are in the business of creating high-end work, you avoid techniques that allow for the slightest margin of error.
- We have also covered the issue of nothing between the top of the two joint seams and the gravitating weather.
- And finally, the right side illustration resulting in our gate giving way, once again, to the madness of gravity. The Slip Joint has no top shoulder, which is a major component of a joint that weighs against the omnipresence of gravity. Whereas the leg-to-apron joint of a dining or coffee table will perform admirably as a through-tenon; the table, unlike the gate, displaces its weight to the floor.
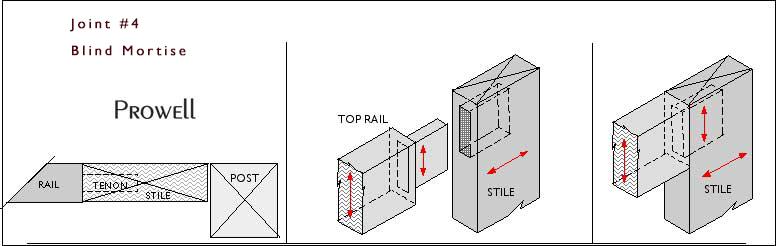
#4: BLIND MORTISE & TENON JOINERY
Click Here for further details and in-progress photos of Joint #3.
The traditional furniture maker’s joint. Here we have a male tenon milled from the same stock of the horizontal rail. The tenon consequently mates to a corresponding mortise milled into the vertical stile. Assuming a good tight fit has been fabricated, this is a reliable and long-standing favorite among woodworkers and furniture-makers, as well as traditional timber frame homes.
Advantages:
- The top of the joint is concealed from the gravitating weather.
- The top of the joint has what we call a ‘shoulder’ above the tenon, preventing, by a matter of simple physics, the tenon dropping to the ravages of gravity.
- No exposed joints or wood seams. If you’re going to expose a joint, be sure it’s a world-class joint.
Disadvantages:
- The issue of breathing in opposing directions is debatable. Not so dramatically as our first two examples, but nevertheless we have a tenon that is an extension of the horizontal rail and this tenon is going to expand and contract in a direction that is perpendicular to that of the stile. To many who have not lived and breathed wood principles since childhood, this is dealt with by a shrug and a raised eyebrow. It is relative, in that there are trades, and then crafts, and then artistry. The tolerances tighten with each hierarchy, and the graduations from one to another does not come overnight, nor without proper tutelage.
- The strength of our joint between the rail and the stile is now resting solely on the properties of the tenon, which is commonly cedar. Not exactly a species exhibiting the densest properties. (The joint is a favorite among traditional timber-framing, where the primary beams are locked in place with blind mortise-and-tenon joinery and secured with Integrity Pins, or dowels that carry through as an organic locking mechanism. But traditional timber-framing requires strong, dense properties, such as Douglas Fir or Spruce to accomplish the spans that support the stress loads of a second floor or a roof, without sagging. There are of course tables and equations calculating the length of a span and the stress load of what it supports to the density properties of acceptable species–A one-story structure supports only the joists, rafters, and roofing material, whereas a two-story structure supports all this in addition to the load of the upper floor–joists, sub-floor, partitioned walls and perhaps a grand piano. A low-density cedar beam calculates to a much shorter span than a stronger, denser, fir or spruce beam. (Note: Although a fair amount of time is devoted, when studying architecture or civil engineering, to the principles of loads and spans, it should be noted and credited that the role of a structural engineer is as vital to the designs of an architect’s vision as is the contractor or carpenter who implements such designs. At its best, the three work together as a team, learning one another’s trades over the course of their time together, and yet defaulting to one another’s expertise within their given specialties.)
- There are some, such as the noted furniture-maker Sam Maloof, who believed the mortise itself removes too much wood, and consequently weakens the receiving end of the joint.
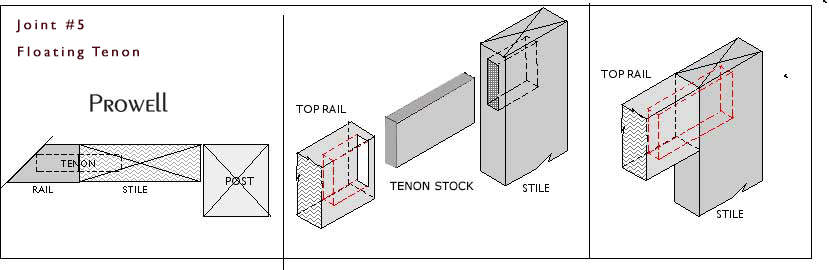
#5: FLOATING TENON JOINERY
The natural graduation from the Blind Tenon is the Floating Tenon Joint. A versatile joint utilizing horizontal mortisers and offering the forgiveness of creating the tenon after the mortise has been cut. It can also allow for the use of wedges and splines to improve the fit to an even tighter mate.
Advantages:
- Helps eliminates the issue of the tenon breathing perpendicular to the stiles and rails. The rail can breath and expand without the close association of it’s tenon, which is a separate stock.
- Excellent strength and stability, as long as the tenon fits snugly to the mortise.
Disadvantages:
- Because the horizontal rail can conceivably be up to six feet in length, this optimally requires a stationary horizontal mortising machine in lieu of the standard tenon jigs used in #4.
- A small, albeit insignificant, amount of cross expansion.
- Larger heavier loads (140lbs+), with the pull of gravity, requires something more. See below.
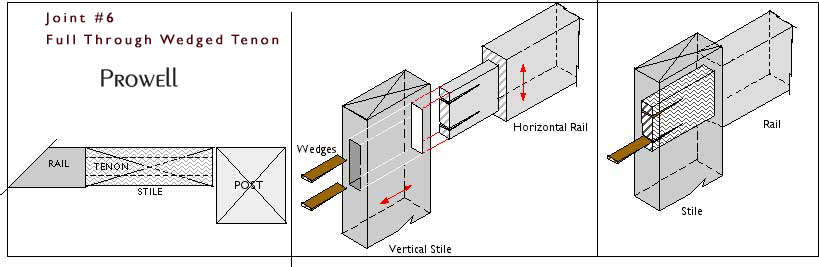
#6: FULL THROUGH-WEDGED INTEGRATED TENON JOINERY
Click Here for further details and in-progress photos of Joint #6.
An Integrated tenon is an extension of the rail, carrrying the above joint two steps further. Utilized by Japanese temple builders, the joint is self-sustaining in that it plays to the dimensional changes occurring from season to season. Not only does the full tenon strengthen the gate’s stile against repeated slamming when exposed to wind tunnels as well as increase the lateral integrity, but theoretically the wedges eliminate the need for glue. Theoretically.
Advantages:
- The top of the joint is concealed from the falling weather.
- The top of the joint has what we call a ‘shoulder’ above the tenon, preventing, by a matter of simple physics, the tenon dropping to the ravages of gravity.
- The joint is created with dry stock between 6-9% moisture, and therefore at its smallest dimension. The wedges tighten the joint to the dry conditions of the shop and once exposed to any weather–as in rain, humidity, even fog–the tenon and wedges expand and the joint grows tighter and tighter. In the drier weather, the joint returns to the conditions in which it was created in the shop.
- Theoretically a glueless joint. But if you are fabricating in one temperate climate and shipping to a wholly different climate, caution would prompt the insurance of adhesives.
- There are temples in Japan and Norway constructed with this joint that have been standing for a thousand years. Standing, we’ll add, in a controlled environment of a temperate climate without exposure to tourists and their bacteria nor the fluctuations in humidity and moisture common to the conditions found in Hawaii or Southern Florida.
Disadvantages:
- The edge of the gate’s stiles can no longer be easily planed by the on-site carpenter. Planing is often required if the dimensions provided to us turn out to be in error or one or both of the posts or columns are in fact out of plumb. The site carpenter must plane the edge of the stile to create the uniform clearance, and lesser experienced carpenters are going to be tempted to reach for their plastic suitcase housing a collection of nifty battery-powered tools bought at Home Depot and if he pulls out the nifty Circular Saw, we can liken the ensuing procedure to a battlefield medic performing surgery with his bayonet. As the fabricator, whose product is subject in part to the variables of installation, we’re producing a better joint with #6, but a joint that may cause hurdles to the installer.
- Not altogether a simple methodology. There is a fairly exacting system to the length of the pre-cut kerf in the tenon and it’s positioning from the edges of the tenon so the wedges do not, when hammered into place, drive beyond the pre-cut kerf and into the remaining tenon until the tenon itself splits. Not the worst scenario, as the the split tenon by theory remains contained by the mortise itself.
#8: THE EMBEDDED FULL THROUGH -WEDGED BUTTERFLY FLOATING TENON with
LOCKING HAUNCH
(Whew. A mouthful )
Click Here for further details and in-progress photos.
Click Here to view this sketch as a full-size PDF.
Functional joinery as performance art.
Advantages:
- All the same advantages as the above #6.
- The combination of the tapered tenon, the wedges, and the locking keys makes it an ideal joint for the larger loads of 150 lbs+.
Disadvantages:
- Complicated to fabricate.
- Requires a lamination sequence.
- The locking key is limited to the tenon. Carrying this entirely through the tenon and into the rail stock, as with #9, removes too much tenon stock.

#9: FULL THROUGH -WEDGED TENON JOINERY with DOWEL LOCKING KEYS
Click Here for further details and in-progress photos of Joint #9.
Click Here to view the below sketch as a full-size, 2-page PDF.
Functional Joinery as performance art.
Advantages:
- Carrying the #8 joint to a more practical conclusion.
- Eliminates the need for lamination.
- Minimizes the stock removed from the tenon with the 3/8″ dia. locking keys
- Dowel keys extend completely thru the tenon and into the rail for optimal hold.
Disadvantages:
- None to speak of.
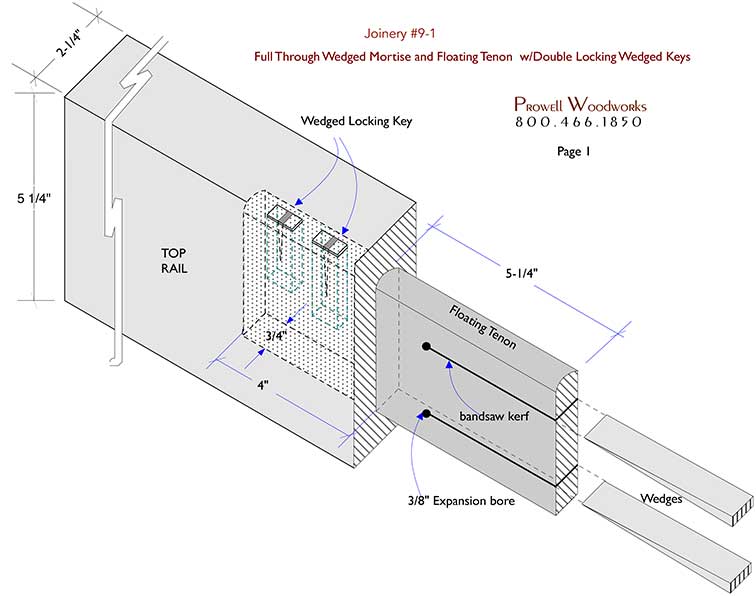
#9-1: FULL THROUGH WEDGED TENON JOINERY with DOUBLE LOCKING HAUNCHES
Click Here for further details and in-progress photos.
Click Here to view this sketch as a full-size, 2-page PDF.
Functional joinery as performance art.
Advantages:
- All the same advantages as #8 while reducing the removal of tenon stock.
- The combination of the tapered tenon, the wedges, and the locking keys makes it an ideal joint for the larger loads of 150 lbs+.
- The Locking Haunches do not extend through the entire tenon, thus as improvement on the integral strength of the tenon itself.
Disadvantages:
- Complicated to fabricate.
- The locking keys must be aligned with some precision to the center of the tenon’s thickness.
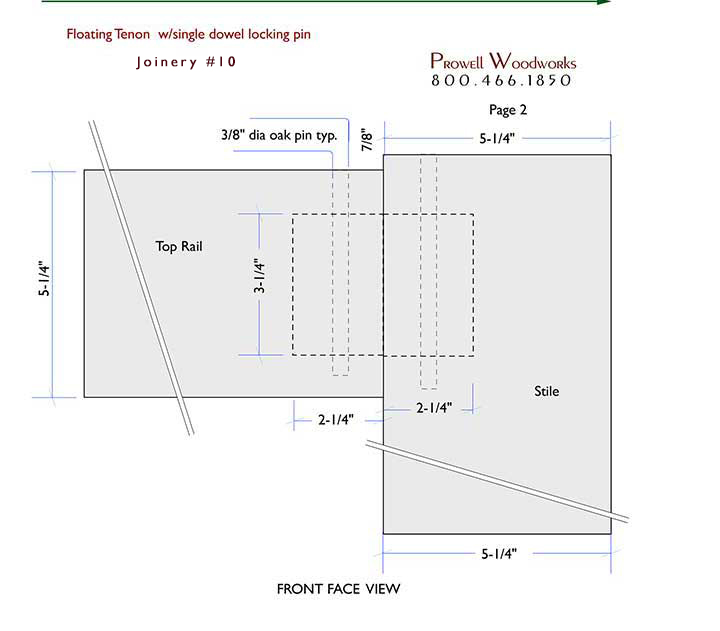
#10: FLOATING TENON JOINT with DOWEL LOCKING PINS
Click Here for further details and in-progress photos.
Click Here to view this sketch as a full-size, 2-page PDF.
A version of Joint #5 that is strengthened with 1/4″ dowel locking pins.
Advantages:
- Considering the time and effort, an extremely efficient and strong joint.
- All the same advantages with #6
Disadvantages:
- Gate widths restricted to 60″ and 120 lbs.
* We’ll take a moment to address the noticeable absence of integrity pins. Integrity Pins are a mainstay of mortise and tenon joints throughout history, serving the same function as our vertical locking keys/pins but appearing instead on the face of the stock. Bored through the full thickness of the gate’s stile. But because there is more gravitational pull on a gate than a dining room table (whose leg-to-apron tenon is traditionally pinned) the pins tend to actually weaken a gate joint. If the stile stock is 2-1/4″ thick, and the tenon is 1″, it leaves cheeks on either side of the tenon at only 5/8″ thick, and set close enough to the edge –1″–that in time gravity pulls the pins to where the grain of the stile can actually split.
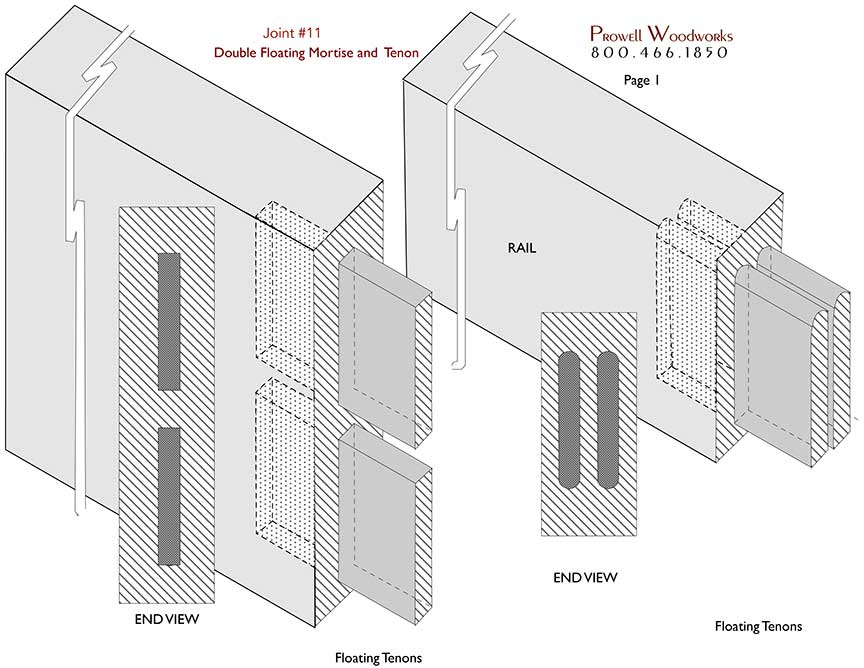
#11: DOUBLE STACKED FLOATING TENONS
Click Here for further details and in-progress photos.
Click Here to view this sketch as a full-size, 2-page PDF.
Essentially doubling the glue mass of Joint #11.
Advantages:
- All the advantages of #11.
- Twice the glue mass.
Disadvantages:
- Stiles and rails of 2-1/4″ thickness minimum.
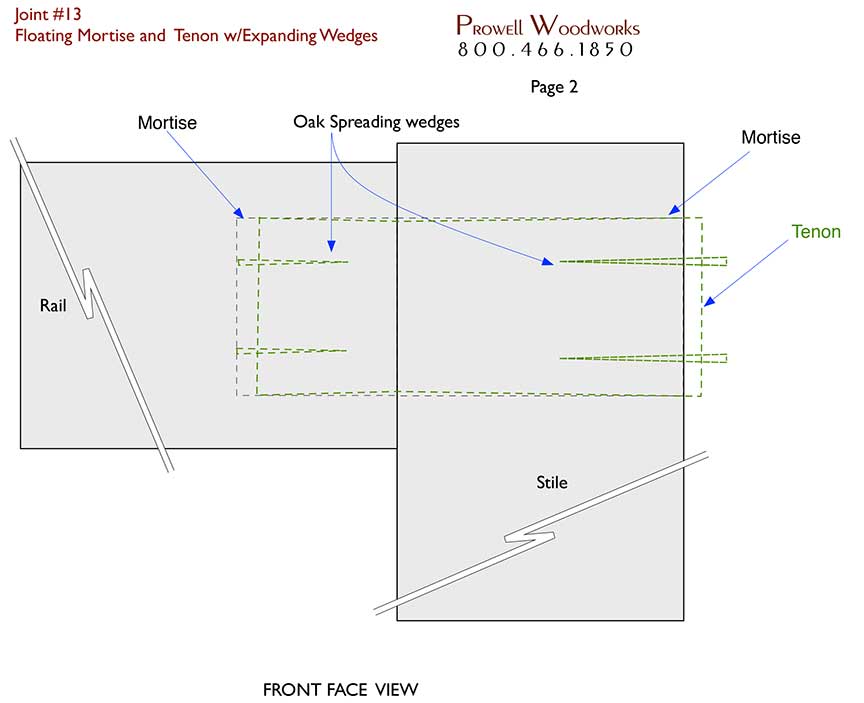
#13: FLOATING EXPANDABLE TENON WITH STOP WEDGES
Click Here for further details and in-progress photos.
Click Here to view this sketch as a full-size, 2-page PDF.
Advantages:
- Expansion tenons.
- Blind wedges in lieu of locking keys and Pins.
Disadvantages:
- More time consuming.
- The complexity of the length and exposure of the blind wedges cannot be understated. If the exposed length of the wedges are too long, you prevent the tenon from reaching the full depth of the mortise.
- Once the joint has been set, there are no do-overs. i.e. you cannot dry-fit this joint.
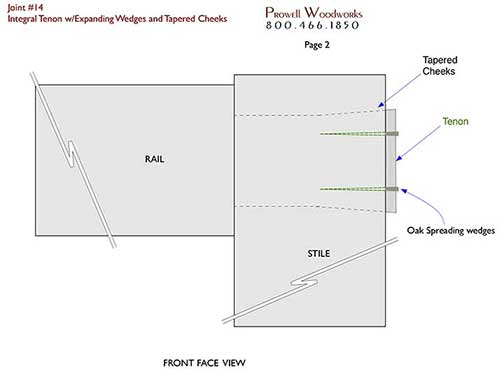
#14: INTEGRAL TENON WITH WEDGES. SQUARE TAPERED CHEEKS
Click Here for further details and in-progress photos.
Click Here to view this sketch as a full-size, 2-page PDF.
Advantages:
- By tapering the top and bottom cheeks of the receiving mortise, the wedges expand the tenon to a width beyond the entry point. The physics alone disallows the failure of this joint.
- The Integral Tenon is stronger than a floating tenon.
Disadvantages:
- Cutting square-cheeked mortises is time-consuming and requires an added 12″ of rail stock.
- Tapering the top and bottom cheekss is even more time-consuming.
- Learning how to hone a chisel, how to use the chisel, and how to create a straight, consistent angle to the taper is rewarding, and at this juncture, time becomes somewhat irrelevant.
![]()
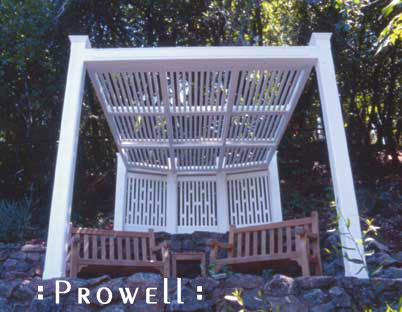
more. . . JOINERY IN ACTION
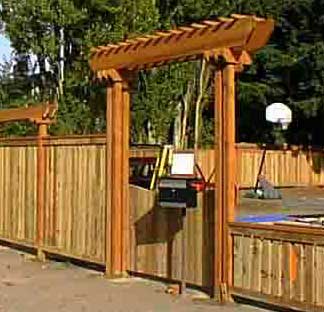
Below left we have a structure illustrating a common post-and-lintel methodology that relies on the holding power of metal fasteners–brackets, screws, nails, etc. As well as a design that invites a limited lifeline before the onset of beams and joists giving in to the ravages of twists and cups and warped eventualities.

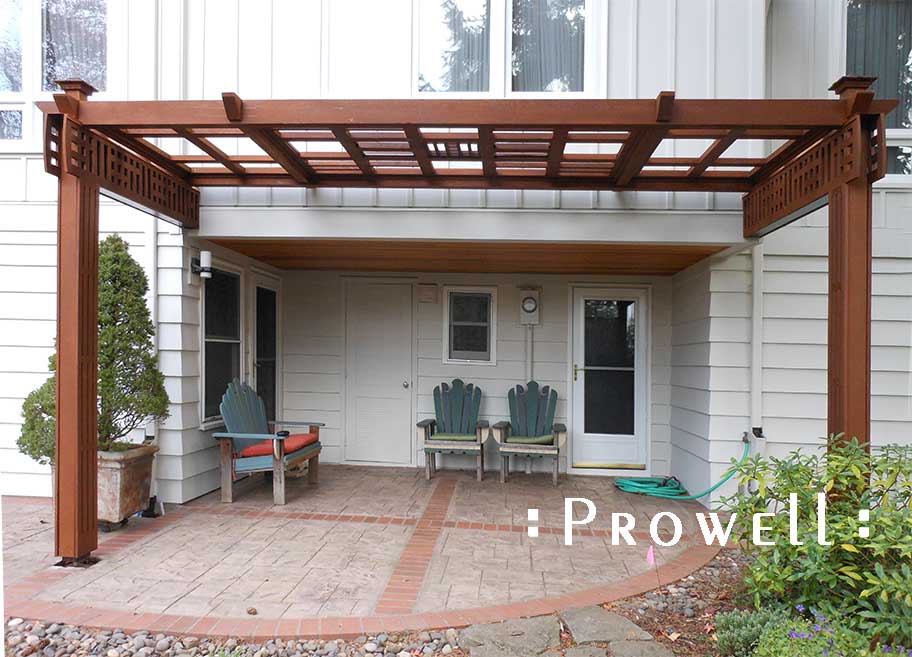
Below right we have a Prowell Pergolas designed and built illustrating a system of joinery that provides not only a departure in aesthetics, but an opportunity to stabilize the components to withstand its exposure to the elements.
ARBOR #23
Let’s imagine nailing a common fence board to frame boards. Say, two nails at the top and two nailds at the bottom? To the right of the right nails, and the left of the left nails, the board can breath through the seasons. But between these nails, the board cannot breath: It is pinioned in place by the two nails. If if tries to expand in the wet season or shrink in the dry season, it will experience stress, and consequently become vulnerable to cracks, bowing, and even splitting.
That’s the basic premise that applies to every wood component of every assembly that is fully exposed to the elements on 360-degrees. (This does not include front entry doors or siding, both of which are insulated on one side and protected by a roofline.).
Below left a common arbor assembly, again illustrating a stacked, applied approach where layers of wood are mounted to other layers by a fastening system of nails, screws, etc.
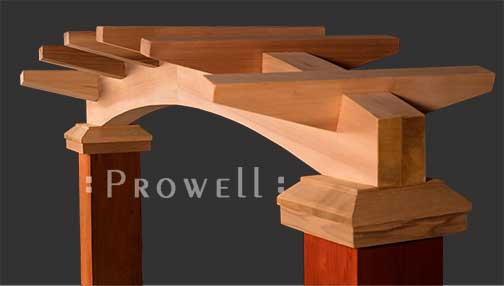
Below right we have Prowell’s Arbor style #8, with a single arched truss of 3″ thickness and a series of cross-slats mortised in place.
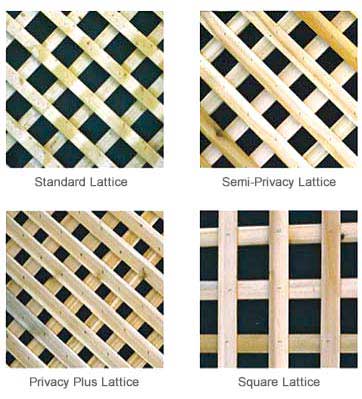
Below left: a few examples of common lattice panels, with each joint secured by staples.
To the right, A Prowell fence-line in San Francisco, illustrating 150-running feet of flush joinery. The grid are half-laps with oak dowel pins. It should also be noted that with the proper joinery, a grid enjoys the exponential lateral strength of each joint working in concert with the whole.
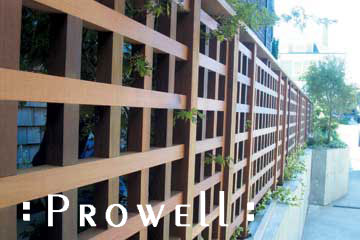
Showing the versatility of design enabled by choosing, or innovating, the right joint for the right application, while being forever aware of the dimensional changes from season to season.
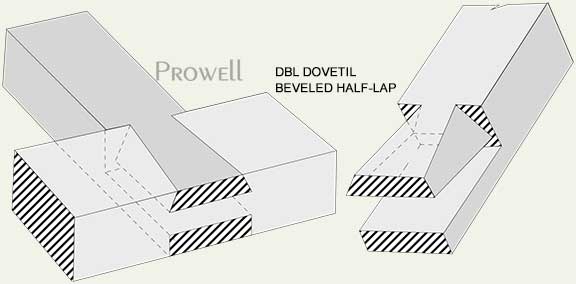
PERFORMANCE ART
A few examples to help illustrate the alluring temptation toward joinery as both a functional solution, as well as performance art. Although a few of the below examples are beyond reasonable requirements, the idea is to illustrate how joinery not only defines the limits of functionality and stress loads, but in all likelihood, the life of the work itself.
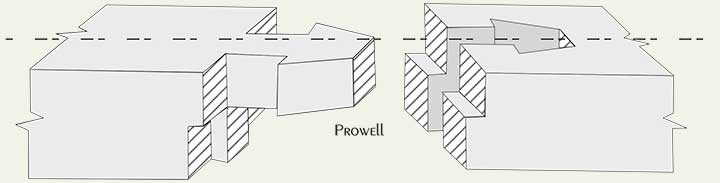
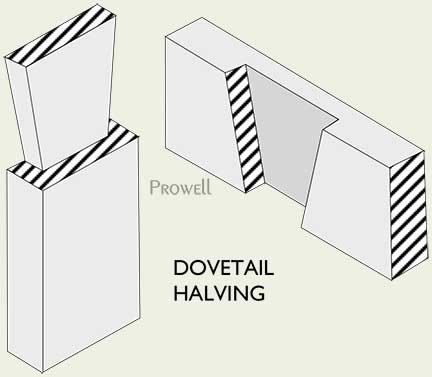
Below is a look at an interlocking dovetail with stepped haunches, or shoulders. A spline, essentially, that might, to the layman, more closely resemble a Rubik’s schematic. The joint begins with dry stock at 6-7%+_ moisture and at its smallest dimension. Once exposed to the elements, it will absorb the dew or fog or humidity and consequently expand. As it expands, the joint grows tighter and tighter. And stronger. Hence, this is a glue-less joint. In the driest climates, it will never contract to less than the 6-7% moisture levels, as within those woods suited for exterior exposure 6-7% of the moisture reading is not in fact moisture absorption, but rather the inherent tannins, or oils, similar to the plasma of our own bloodstream.
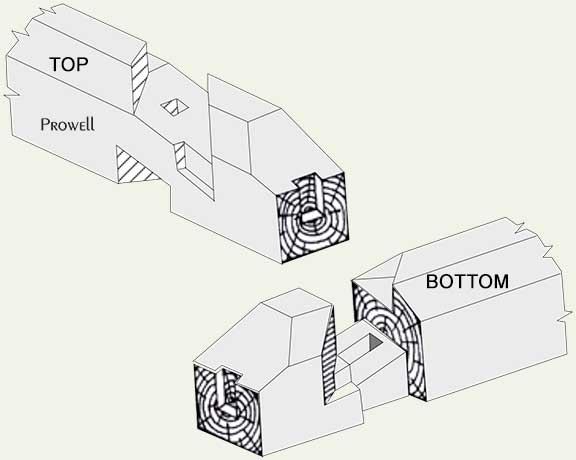
A look at another glue-less joint, where the interlocking planes and wedges are such that the joint is self sustaining. The example here is often utilized in Japanese temples for joining the rafter tails to cross-beams. Take notice of this on your next trip to the San Francisco Japanese Tea Garden in Golden Gate Park. It’s an extraordinary joint, relying solely on the execution of the Jointer’s steady hand. The 7-year renovation of the structures within the Tea Garden was performed about 20 years ago by a team of trained temple-builders from Japan, and in itself is worth the scrutiny of the most discerning eye.
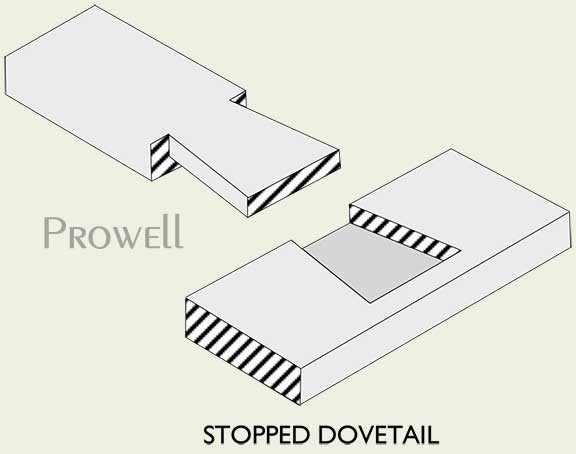
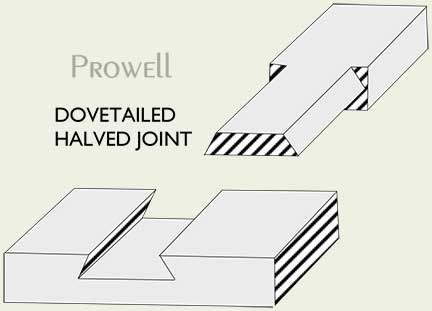
The Half Dovetail and Stopped Dovetail glue joints below are good exterior joints, allowing for a tightened joint with moisture absorption and expansion.
More Dovetails.
A Half-lap with the added hold of a bevel cut.
A half-lap with a shouldered haunch.
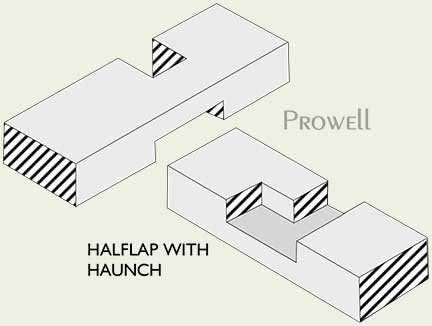
Not as difficult as it appears.
MORE JOINERY IN ACTION
A few Further Examples applied to furniture and casework.
As a small part of an extensive Prowell interior design, the use of the traditional, yet modified, Finger Joint adds an alternative flavor to the standard Miter Joint more commonly used here.
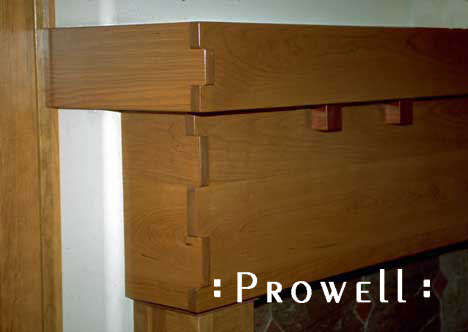
The above, and below, finger-joint was wildly popularized by Greene and Green in 1917. Brothers and architects whose greatest asset was a lifelong association with a top notch team of woodworkers who realized their designs with flawless workmanship. Below, a detail known to any of their legions of fans. This can be seen on a public tour of the Gamble House in Pasadena, CA.
TRESTLE TABLES
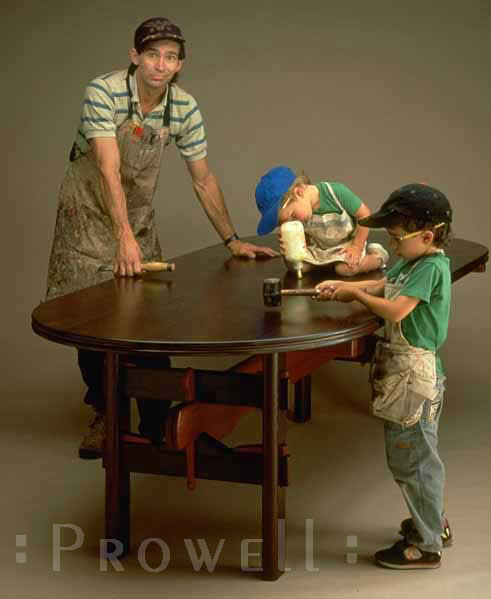
A Prowell table design from approximately 1985. The exposed joinery of a trestle table employing both the Exposed Wedges of the Through-Mortise & Tenon Joint, but also the Primary Vertical Wedge joining the trestle board itself.
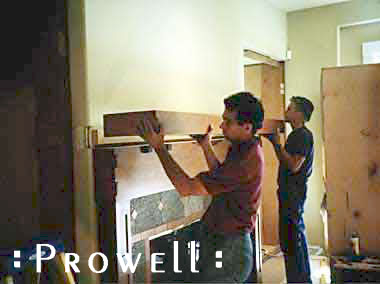
Left: Prowell oversees the early apprenticing of Ben (on the table) and his older brother Sam.
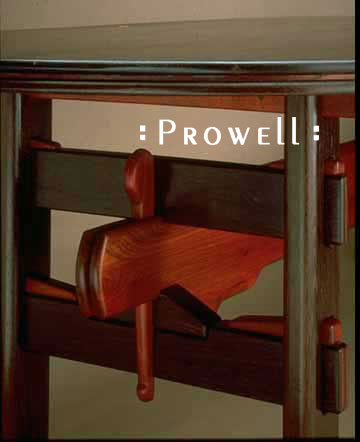
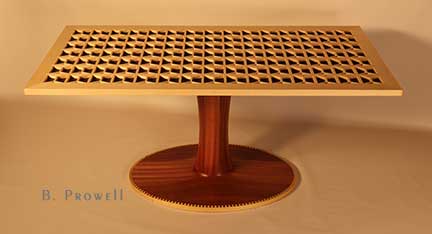
TRESTLE TABLES
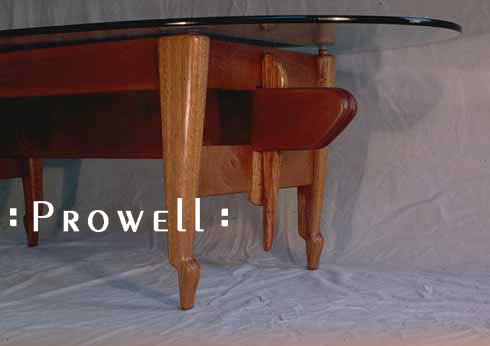
Another look at a Prowell coffee table using the Vertical Wedge to join the trestle board.
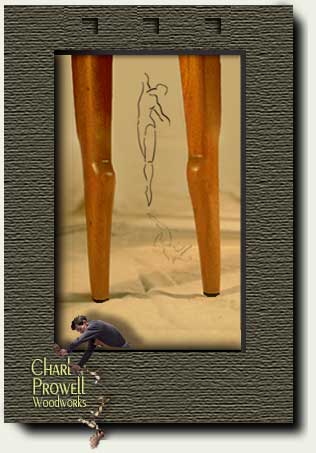
Joinery of this nature becomes a defining feature of the work’s inherent design. This same joint went on to be designed into innumerable patio and terrace tables exposed to the elements. A joint with a great deal of forgiveness. The leg profile shows the first prototype of what later came to be known as Prowell’s Ballerina Leg., elongated and maturing as a much more effeminate, even sensual profile. On the right, the same leg profile, fine-tuned a few years later.
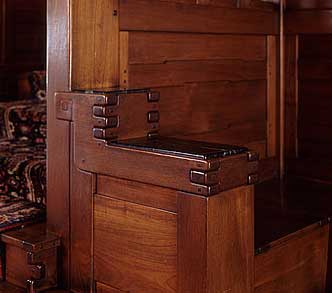
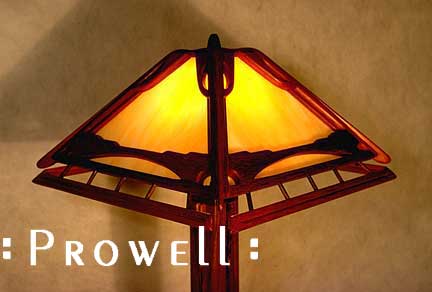
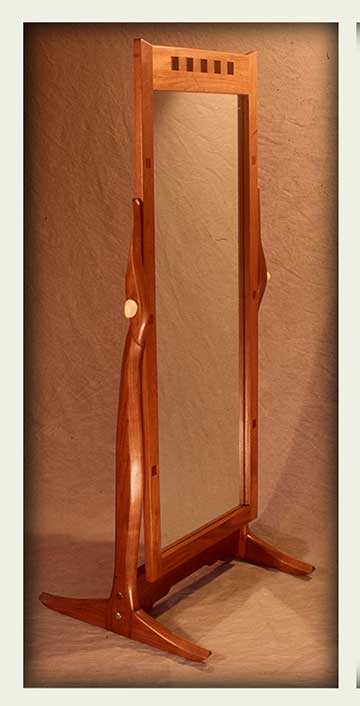
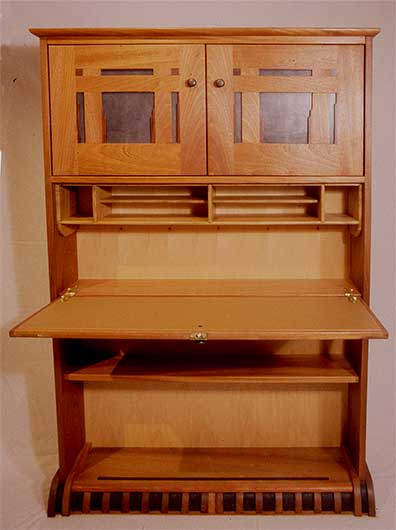
LAMPS, DESKS, MIRRORS
The hierarchy of joinery takes us to a series of intricate Prowell lamp joints–on the left–, and with Prowell’s Stand-Up Desk on the right,a near-obsessive use of the joint as a wood hinge in Peruvian Walnut. The Stand-Up Desk, and hinges, can be explored in detail in Fine Woodworking #77
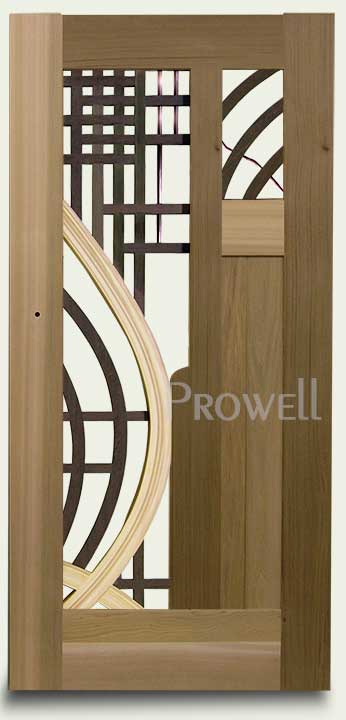
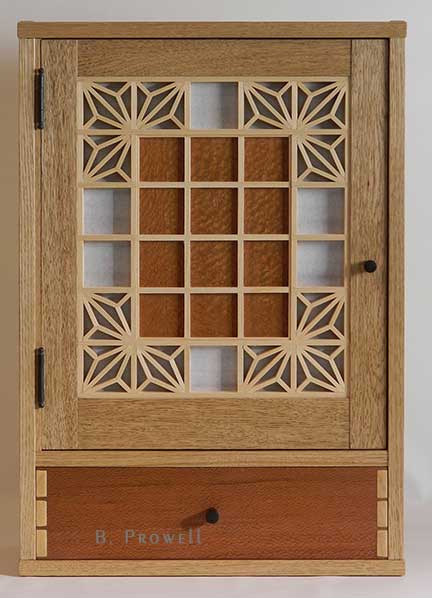
Below, Ben’s exercises in the Japanese Kumiko patterns for both the coffee table and wall cabinet are examples of joinery at its more demanding levels.
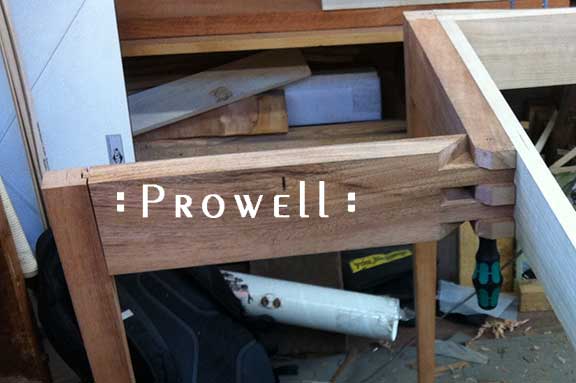
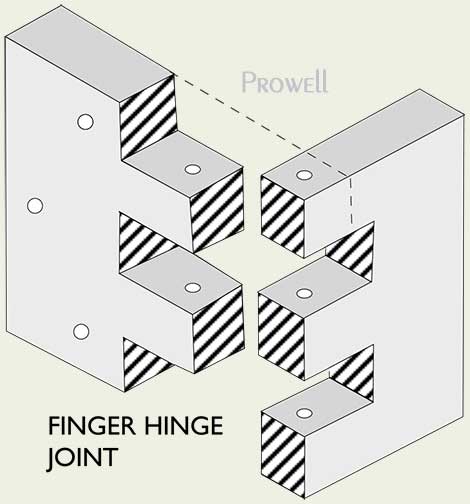
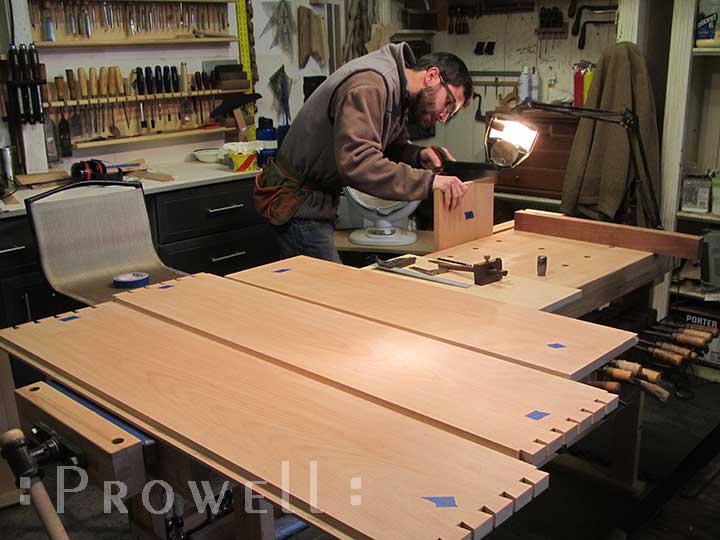
HINGE FINGER JOINT. SERPENTINE FOLDING TABLE
Below, a Serpentine fold-out table by Ben Prowell using a rendition of the finger joint hinge for the pivoting back leg. In the lower photo of the table itself, the top flips over to double the surface area, supported by the hinged leg.
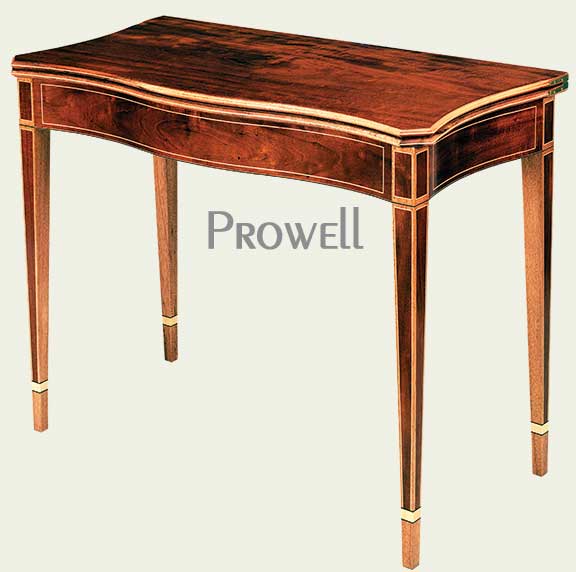
DEMI LUNE TABLE
Ben Prowell’s Demi Lune, exhibiting the period banding techniques from the 17th century.
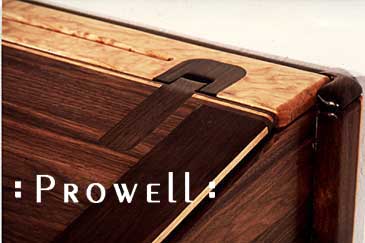
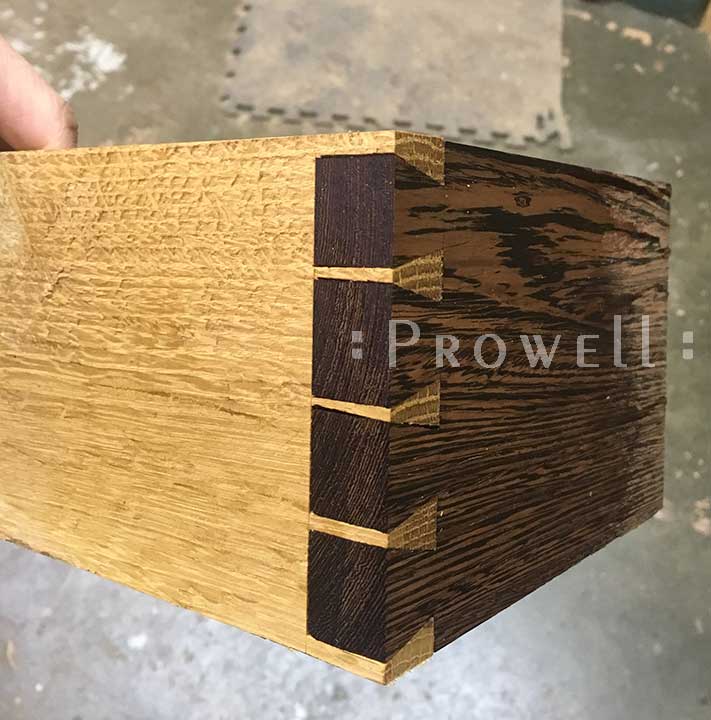
CARCASE DOVETAILS
Ben Prowell hand-cutting a series of dovetails.
A finished dovetail joint, combining wenge and quarter-sawn oak.
For more Joinery-in-Action, visit Ben Prowell on Instagram and YouTube, linked below.