![]()
FENCE LAYOUTS
An example Layout for configuring the Prowell Wood Fence costs.
We would prefer you present your fence orders as a index of specific panel styles at specific net widths. Calculated by either the specifications below, or by calling and writing with the questions that allow the math and layout to be done at the site level by either the homeowner or the contractor/installer.
And yet orders for fence panels arrive in varying levels of preparedness and we are available to translate your inquiry into an index of what works with your proposed layout.
A) Do your layout and landscape design with our product specifications in mind along with the specific Fence and Gate styles. Present us with an index of panels at their net widths and heights. A gate style with the rough opening between posts. We will corroborate your total cost. When and if the project is scheduled, and an advance payment made, we will provide front-view elevation drawings of the fence and gate styles for your review.
B) Decide upon your fence and gate styles and roughly sketch out your layout, noting overall dimensions. We will calculate your panel count and provide you with the cost. To move forward, accurate measurements should be secured by you or your installer, followed by our dimensioned drawings of all panels and gates with distinct net measurements. The panels are labeled, on the drawings and on the product, corresponding to fence-line sections on site.
C) Present your dimensions as an email text, and attach any site photos that will assist us in helping to select the most appropriate fence and gate style. Photos such as the fence/gate location, and any architectural precedents existing within the site that may influence the eventual design. We’ll provide a quote with a panel count and total cost.
D) For contractors and architects, please calculate your specs for post-to-post dimensions. We do not have the time to translate blueprint specifications.
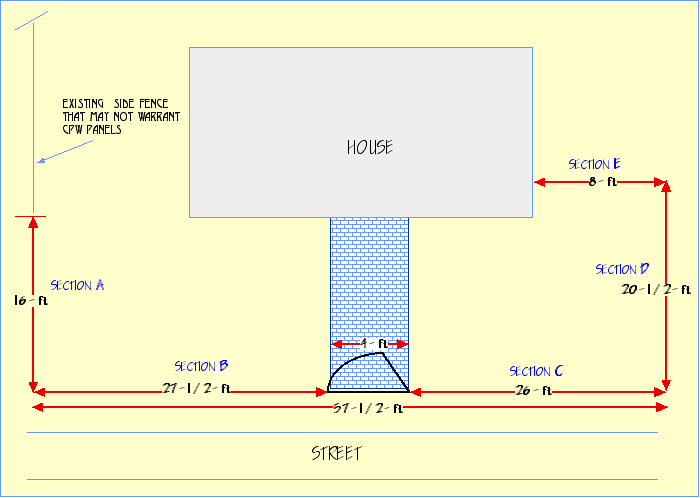
Step 1) Determine the length of the fence line you propose to replace or create. The image below suggests a preferred method for going about this procedure.
Step 2) In the below layout, we have labeled our various sections of continuous, unbroken fence lines. Sections “B” and “C” include a gate break, so a measurement for the entire run are provided, as well as to the left and right of the proposed gate opening. Let’s begin with Section “A”. Figuring on the use of 6×6 posts, we’ll first convert 16-ft to 192-inches (16 x 12). We now divide 192 by the maximum length of a panel–60″– plus it’s accompanying post–5-1/2″. 192 divided by 65-1/2″= 2.93. This means we have two full panels and nine-tenths of a third panel. Anything over a whole number must be considered as a panel, otherwise we would be stretching our maximum length to more than 60-inches-per-panel. We round this up to 3 panels for Section “A”. (We will later configure these 3 panels to equal lengths) Section “B”, at 27-1/2-ft converts to 330-inches divided by 65-1/2″=5.03, or 5 panels for Section “B”. Section “C”, at 26-ft converts to 312-inches, divided by 65-1/2″= 4.76, which is rounded up to 5 panels for Section “C”. Section “D” at 20-1/2-ft, converts to 246-inches, divided by 65-1/2″= 3.75, rounded up to 4 panels for Section “D”. Section “E”, at 8-ft, converts to 96-inches, divided by 65-1/2″=1.46, rounded up to 2 panels for Section “E”. Our Gate is noted at 4-ft, representing the gate opening between the posts. Our conversions, at this juncture, do not take into consideration the added posts at each end of any given run. The finished panel lengths will take this into consideration and be represented in the plan view drawing posted onto each private web site before work begins in the shop.
Step 3) How about installation? Who, exactly, will be installing your fence line and how do you estimate this cost? Installation is a fairly simple procedure made simpler by the PDF Installation Manual. Although this text will accompany your order to insure it is available to your installer, along with the Prowell drawings, it can also be downloaded as a PDF and emailed emailed to your installer for his (or her) review prior to working up their estimate. Click the link to download the PDF Installation Guide (It is also found as a link under the Site map, or within the gate and fence-Cost pages as well as on your eventual site page, along with posted drawings of you order). This will help him (or her) to provide a fair cost involving a system they would otherwise not be familiar with. Your installer, whether in Illinois or Montana, can email us, or call, with their questions regarding site-specifics.
Step 4) Those of you who have managed to reach this point are of two minds: Those who will go on for another several pages, researching interminably; and…those who are now ready to implode after wading through all this and are considering seeing what Home Depot has to offer off the shelf. We apologize for what’s involved in providing a product that is not available off the shelf, or ready-made through your Sears catalog. What you’ll be rewarded with, however, is a product unlike any on earth. A look that will immediately, upon installation, recover you investment and elevate the value of your home to a point that, if you do decide to move, to sell, they’ll be waiting at the gate, bidders and representatives of anonymous bidders, calling out figures to your hired auctioneer in a unprecedented frenzy.


