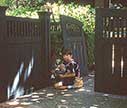

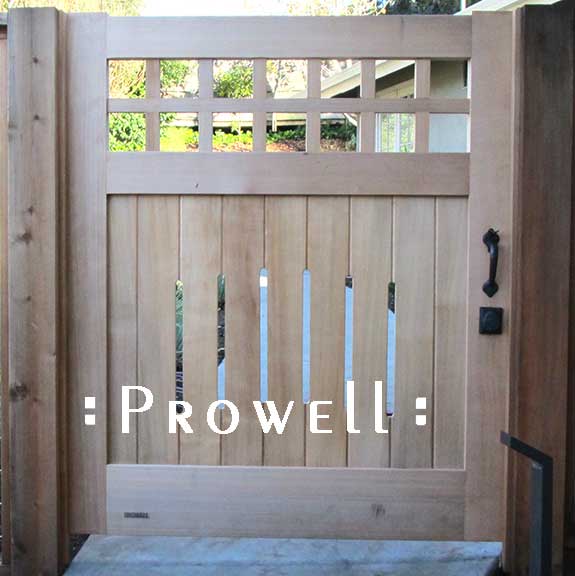
WOOD GATE SPECIFICATIONS
Printed Installation Guides and Working Drawings arrive with all shipped or delivered orders.
There are a few common oversights when installing our garden gates:
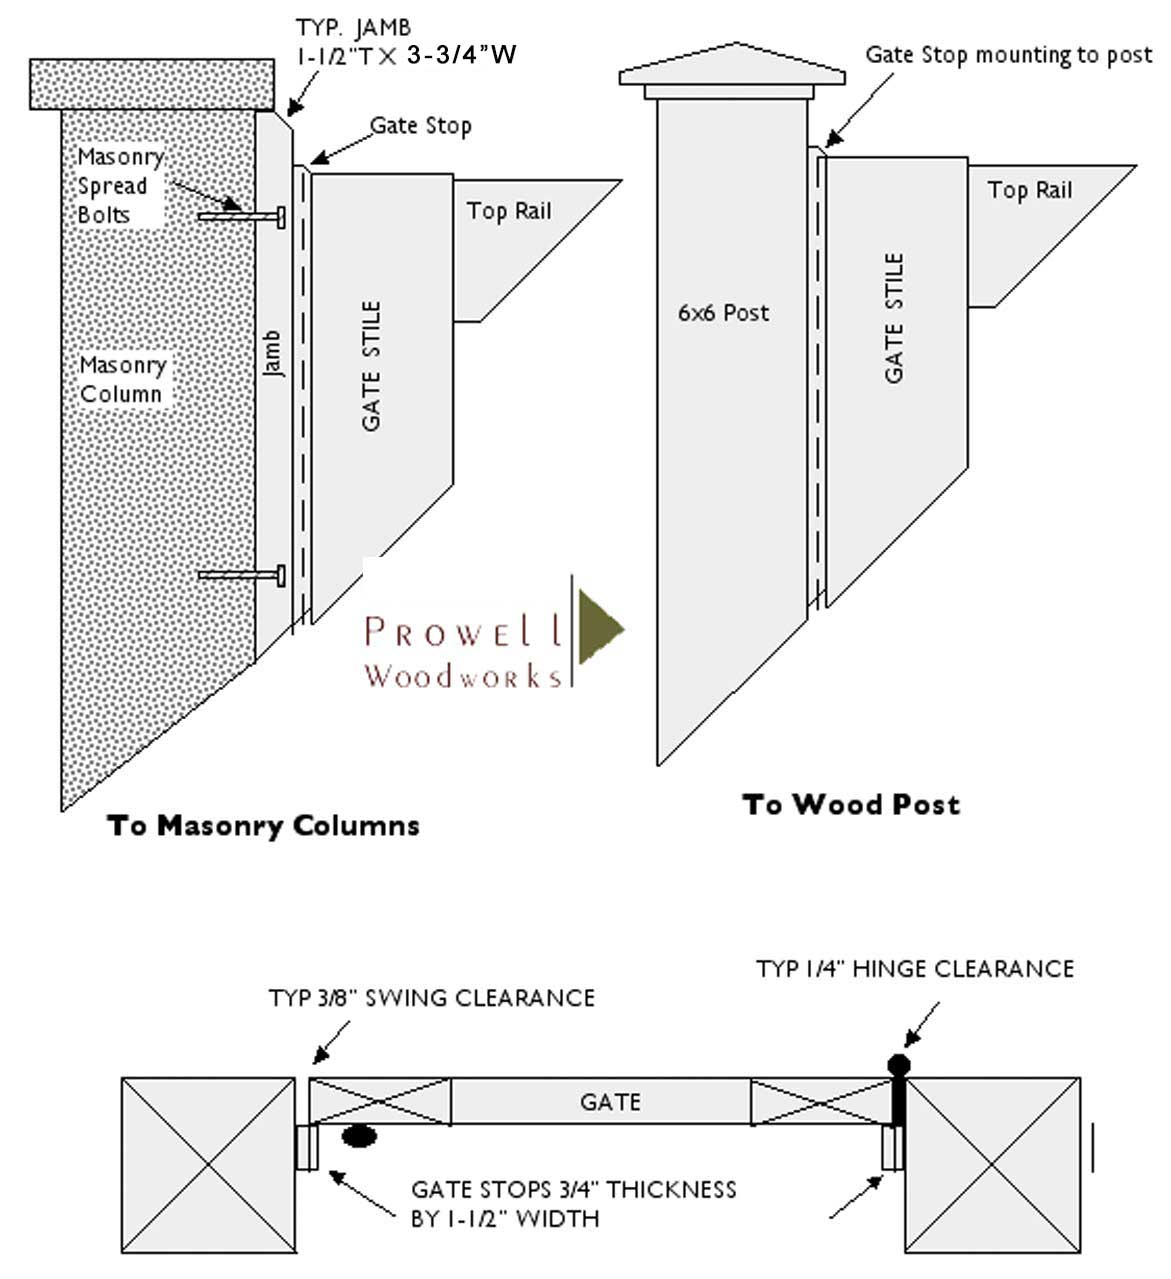
- For Rocky Mountain latches it is necessary to chisel the strike plates flush to the jambs or posts. If they are surfaced-mounted, half the preferred 3/8″ swing clearance is lost and the gates run the risk of swelling in the wet seasons such that they won’t close.
- Surface mount the hinges. The gates need light and air flow on all six sides. All gates included the preferred bronze 4″ extruded ball-bearing butt hinges. These represent the best exterior hinge available and they are included simply to insure a less functional hinge doesn’t jeopardize the functionality of the gate’s swing.
- Ideal swing clearance on single gates is 3/8″ and on double gates a center gap of 1/2″. The net width of the gate was calculated to allow these swing gaps with the given dimensions provided by the site. If your clearance is less than required, due to out-of-plumb posts/columns, you must plane the gate to fit the taper of the listing post. If there is no dead bolt, the gate can be hung and the latch stile can be planed with the gate in position–at 2″ off the grade as designed. . If there is a dead bolt bore, the gate must be removed and planed along the hinge edge. (*b When there are varying rough opening measurements between the top and bottom of your posts, we build the widest width.).
- We do not support the use of electronic strikes or lock sets that compromise the preferred 3/8″ swing clearance. Most electronic access systems require less clearance which can potentially result in the gate swelling during the wet season until it does not close, wedging against the post or jamb to require a shoving/yanking effort with each passage. Any resulting damage is not warrantied for replacement or repair.
WOOD GATE SPECIFICATIONS
![]() JAMBS
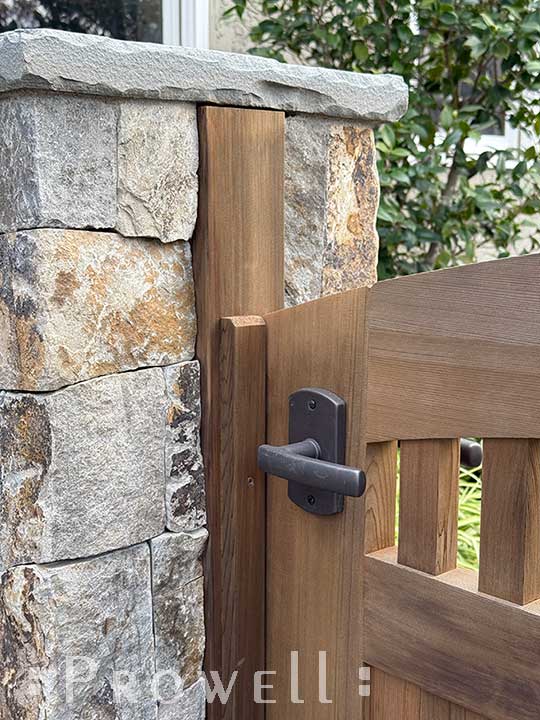
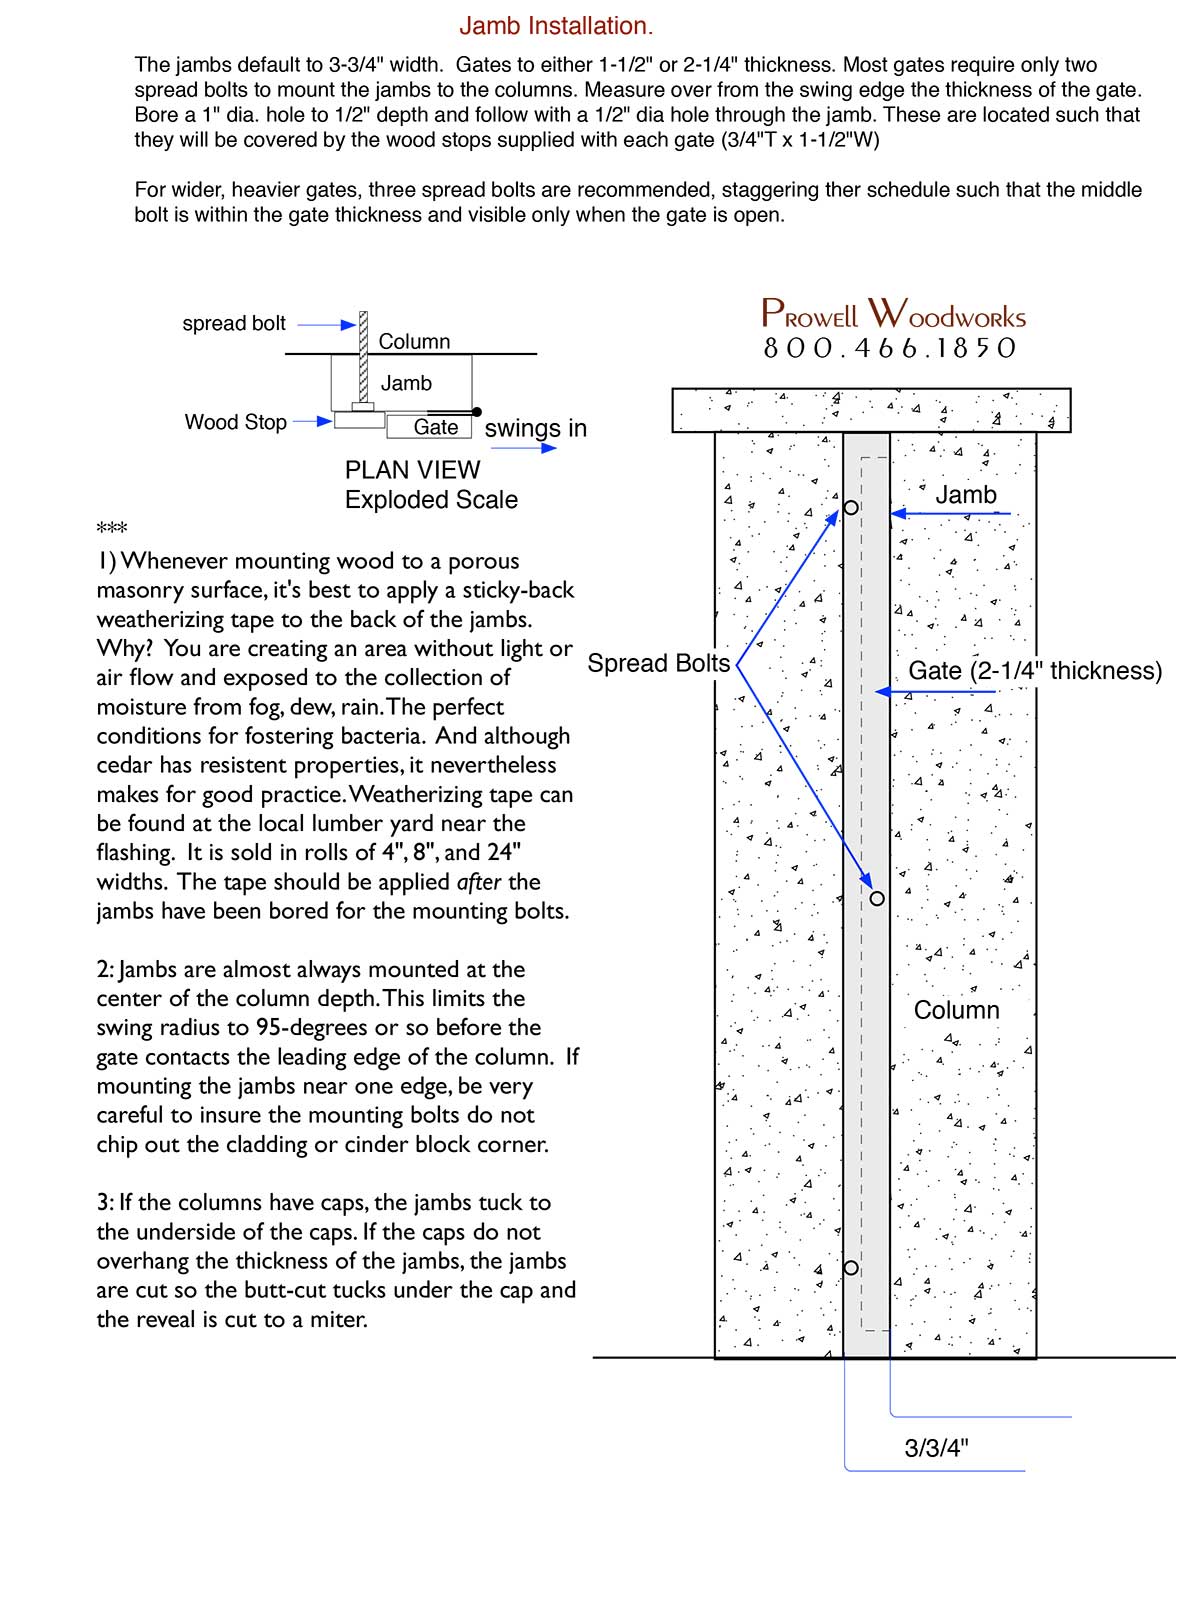
JAMBS
Jambs are provided for sites with masonry columns (stucco, stone, brick, etc). Standard jambs are 1-1/2″ thick x 3-3/4″ width. For columns with smooth faces such as stucco or brick or fabricated paver block, the jambs mount directly against the column. Most installers use the masonry ‘gold’ exterior spread bolt. 3/8″ dia. x 3-3/4″+_ length. The spread bolts are recessed into the jambs, including the wider washers. The wood stops accompanying the gates and mount against the jambs, covers the bolt exposure from being visible.
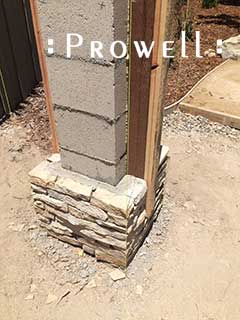
*For columns clad with irregular stone, the jambs are best mounted directly against the column cinder block core. This requires a measurement from the block to the outermost stone; we will adjust the jamb thickness so the jambs are 1/2″ thicker than the proudest stone, allowing a free swing. Normally temporary jambs are set such that the stone mason can proceed with cladding his stonework, cutting to the temporary jambs, which are removed when the Gate and jambs arrive.
** If columns with irregular stone already exist, you can either cut the stone to create a cavity for the jambs, or mount the jambs using threaded rod and back-filling the voids with mortor–adjust the nuts on the threaded rods to insure the jambs are perfectly plumb.
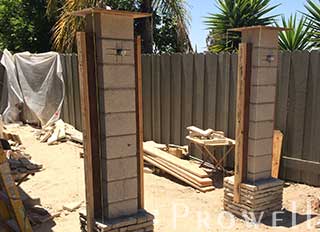
EMBEDDED
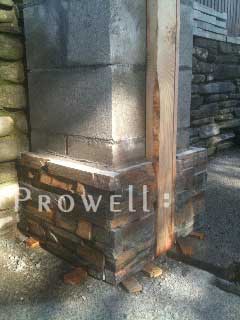
Embedded Jambs-1
A temporary embedded jamb mounted to the block core. The stonemason has set his irregular stone to the jamb template, which is replaced when the Prowell jambs arrive with the gate. The jamb thickness is the depth of the stone + ¾” to allow free gate swing as well as accomodating the length of the latch’s horizontal drop bar. (Using a mock jamb prevents the final jamb from being vulnerable to mortar stains and stone nicks.)
Embedded Jambs-2
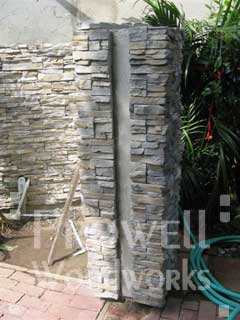
Illustrating how the stone is cut to fit and the voids are filled with mortar for a tight fit. The jambs is ¾” proud of the outermost stone to insure a free gate swing, while also allowing room for the latch Drop-Bar to engage the strike.
Embedded Jambs-3
Illustrating an embedded jamb onto a typical block column with a steel post core and irregular stone cladding.
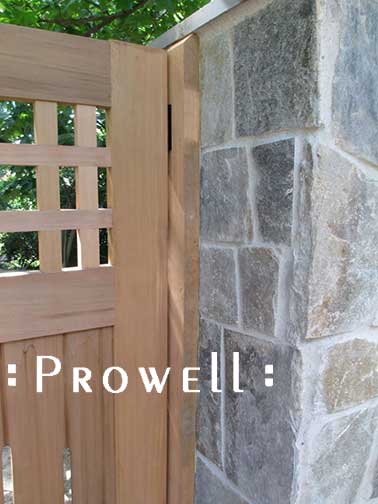
Surface-Mounted Jambs
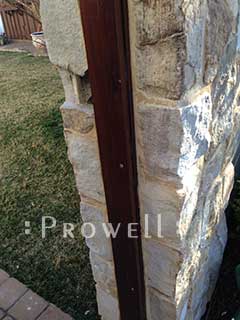
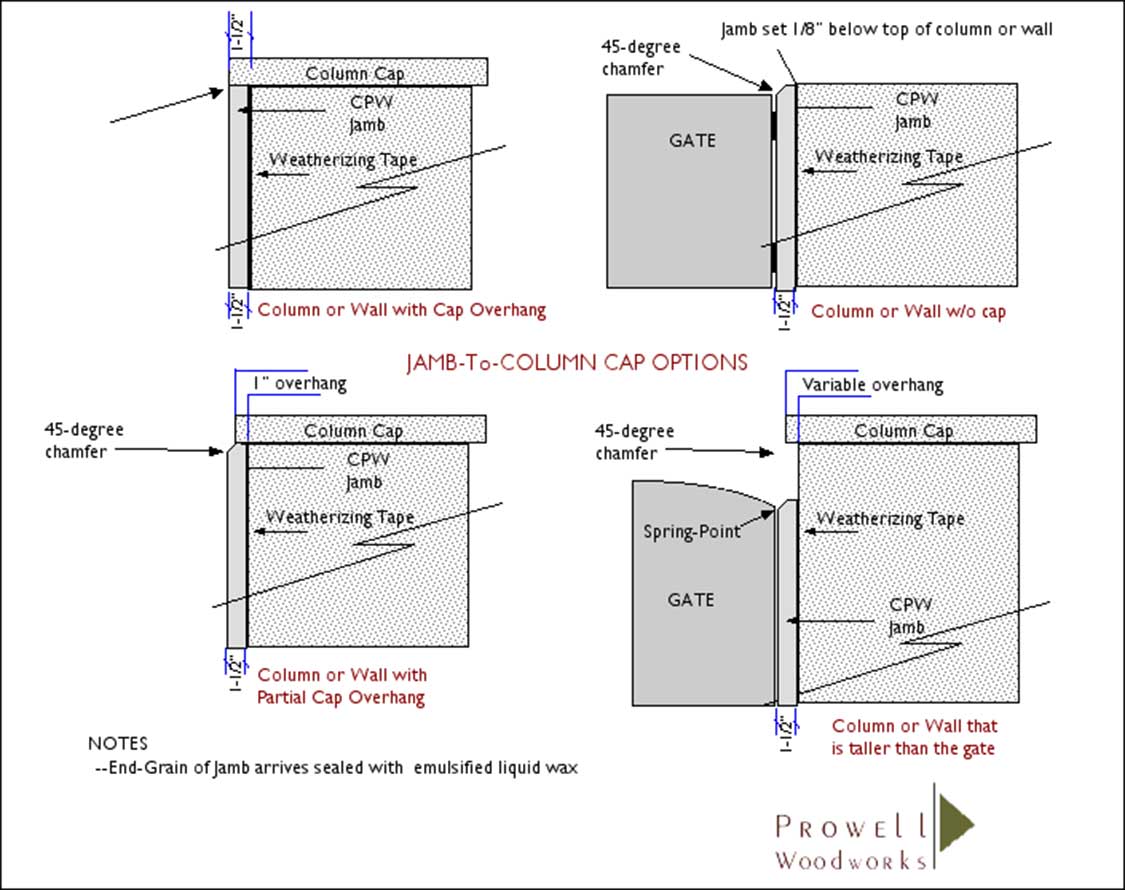
Illustrating a typical jamb mounted to stucco columns with overhanging caps. Here the cap overhangs only 1″. The jambs are 1-1/2″ thick, so the remaining 1/2″ is chamfered (mitered) to avoid the unsightly end cut. The jambs are mounted with recessed masonry spread bolts.
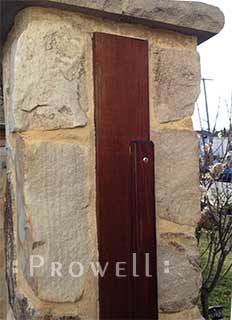
Embedded Jambs-1
A front view of an irregular stone column after the stone has been set and the temporary jamb removed.
Embedded Jambs-2
The total jamb thickness for this application is 2-3/4″. This is the measurement from the cinder block core to the outermost stone, plus ¾”
Embedded Jambs-3
Two columns, with the temporary jambs set. The stone can now be completed, while work on the gate progresses independently.
Surface-Mounted Jambs
Surface-mounted jambs set to the smooth face of flagstone.
![]()
DBL OFF-SET GATES
Double Off-Set gates (click on the image below for more info on Dbl. Offsets,
Or click here
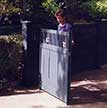
SLOPED GRADES
Sloped Grades can be complicated. Therefore we’ve devoted a whole section. For more on Sloped Grades, click on the image, or here Click Here
![]()
 WOOD GATE SPECIFICATIONS for HARDWARE
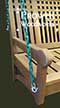
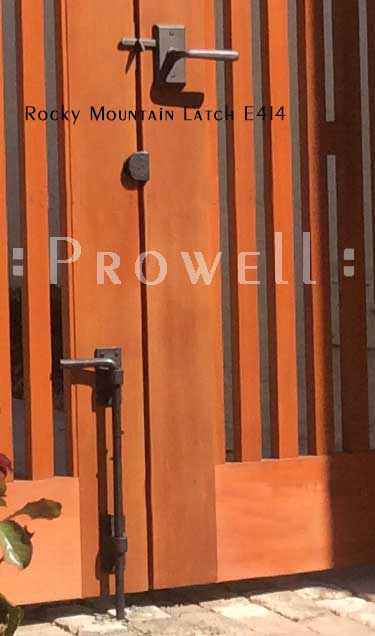
Dbl Gate Hardware
Illustrating a typical #80-100 bronze Cane Bolt and the #50-250 bronze gate stop. The 50-250 is included with all double gates. The cane bolt is an added, but necessary accessory.
Dbl Gate Hardware
Typical hardware for a double gate:
Rocky Mountain E414 latch
Bronze Gate Stop #50-250
Bronze Cane Bolt #80-100
LATCH AND STOPS
The Bronze Gate Stop is required with all double gates. It is this L-shaped thingie that acts as to stop the operable gate, instead of the gate latch itself, which is far too expensive to act as a stop. The mortise for this stop is created in the shop, but to insure the gates are flush when closed, the Stop must be set to the proper depth.
Shown below with the RMH E414.

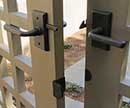
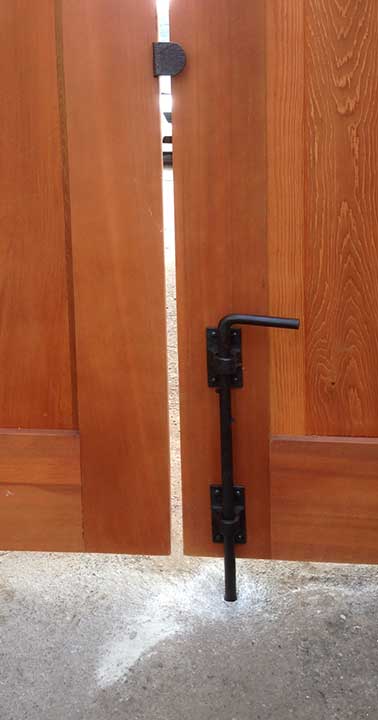
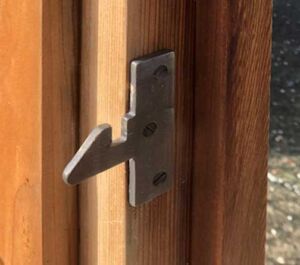
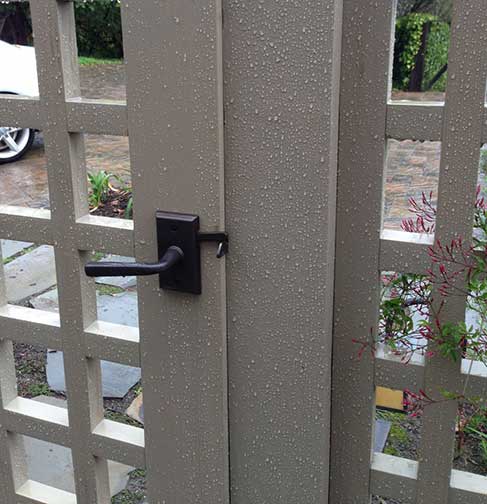
RMH LATCH STRIKE
The strike plate for Rocky Mt latches should be chiseled in flush to the post. If it is simply surface-mounted, you’ve eliminated 1/4″ of the 3/8″ swing gap. The gate will swell in the wet season and be prevented from closing by the thickness of the strike.
DEAD BOLT BY RMH #507
Dead Bolt DB507 most often accompanies the RMH latch E414.
DEAD BOLT PLACEMENT
When there is grid such as this, the dead bolt is set below the latch at a position that disallows someone to reach through the grid to access the thumb-turn to release the dead bolt.
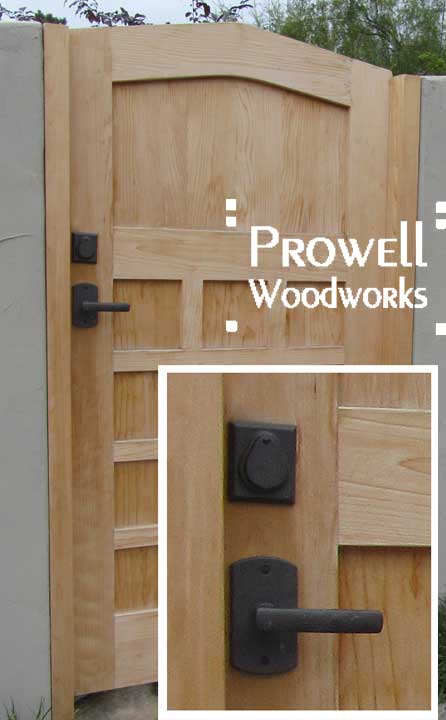
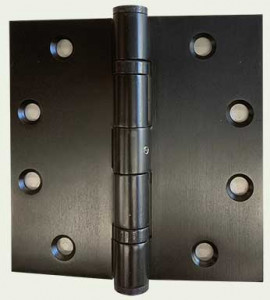
PREFERRED HINGES
Our standard hinge as solid brass 4.5″ ball-bearing in oil-rubbed bronze or pewter patinas. This hinge insures against an inexpensive, cost-cutting alternate hinge from becoming the potential weakest link in the overall integrity of the gates. We also offer the Rocky Mountain hinges HNG4.5A and HNG4A as concealed bearing hinges.
RMH LATCH AND STRIKE PLATE
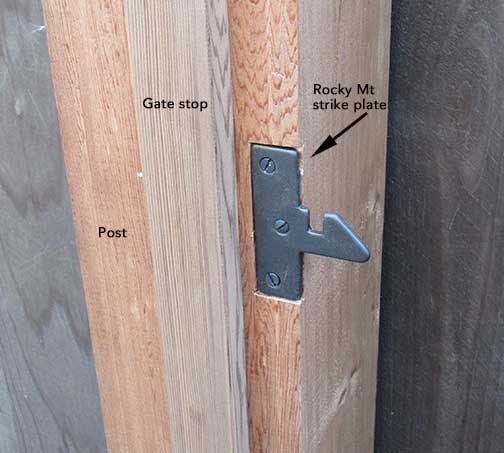
Rocky Mountain strike plates should be mortised (chiseled) flush to the post. If they are simply mounted to the post or jamb, you lose 1/4″ of the 3/8″ swing clearance needed for seasonal expansion and the gate will potentially not close. This is such a common oversight that we include it among the list of common installation flaws in a print sheet included in the white envelope along with your drawings and full installation guides. To be clear, the below image is the wrong way.
![]()
MISHAPS
The following images illustrate the rare mishaps when things simply go wrong.
LARGE DOGS
A photo sent to us in 2017 from a gate built in 1999. The result of two large dogs over the course of, well, 18 years. Now there have been multiple improvements since 2001 that would hopefully prevent such a scenario, but nevertheless, large dogs can be a problem.
SHRINKING PANELS
The gates and panels are delivered at 5-7% moisture in, say, June. Delivered to, say, a dry heat climate is, say, Palm Springs. They are given a finish either at the shop or by the homeowner. As the wood acclimates to the new heat, it gradually dries out beyond the 5-7% moisture and consequently shrinks, exposing a line of unfinished wood that was originally embedded into the dadoes, or grooves, of the stiles and rails. A common issue, requiring that this exposed streak simply be touched up with the same stain or finish. In the wetter months the panel will expand and the once exposed streak will have returned to it’s dado. After a season of both climates, the cedar will have acclimated and the expansion/contraction will occur at a minimal rate.
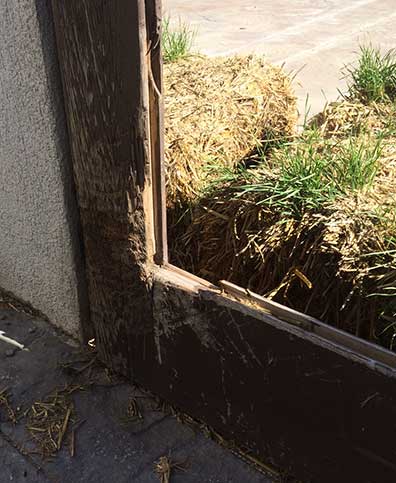
EXPANDING GATES
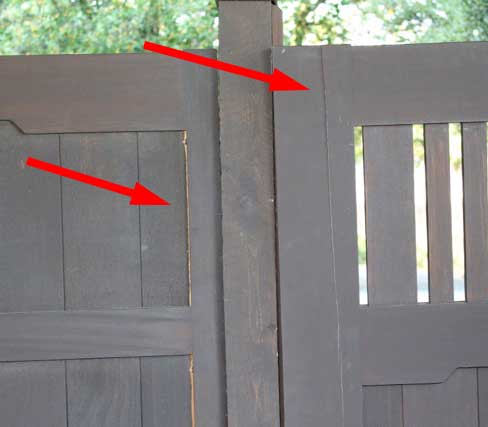
Although the gate shown below was installed at the preferred 3/8″ swing clearance, they experienced the wettest winter in a decade, resulting in the gate experiencing such expansion that it swelled to where it bounces off the post instead of closing properly within the opening. Exasperated by potential wind tunnels that have the gate slamming repeatedly, and bouncing off the post with each slam. Eventually this can result in damage to the vertical stile, as shown in the above right image. Wood is wood and can’t be dictated to the same behavior as steel. In this scenario the gate should be planed down along the latch edge while still in place and until it closes properly, rather than allow it to potentially be damaged beyond use.
SPRING HINGES
Below we see an application where the homeowner has elected to use a type of spring hinge. These are self-closing hinges most commonly available only in steel with some sort of plating that ultimately, quickly, rusts. In addition, the below hinges have been installed improperly—the barrel of any hinge should be proud of the leading edge of the post or jamb. Problem #1. –Problem #2 is that the torque on these hinges has been set to close too aggressively, resulting in a gate that slams repeatedly.
SHIPPING DAMAGE
About once every 5 years or so we encounter a gate that was kicked around during the shipping process that it arrives looking more like a prize fighter after a hard loss. Upon acceptance of the Old Dominion Freight delivery, note any damage to the box or crate and record this on the driver’s receipt form, with your signature. Then, if the gate is in fact damaged, take photos and reach out to UPS (800-333-7400) within 5 days. Provide them with the BOL # on your receipt to register a damage waiver. Old Dominion Freight is a ‘white-glove’ company. (See more on shipping HERE)
PAINTED FINISHES
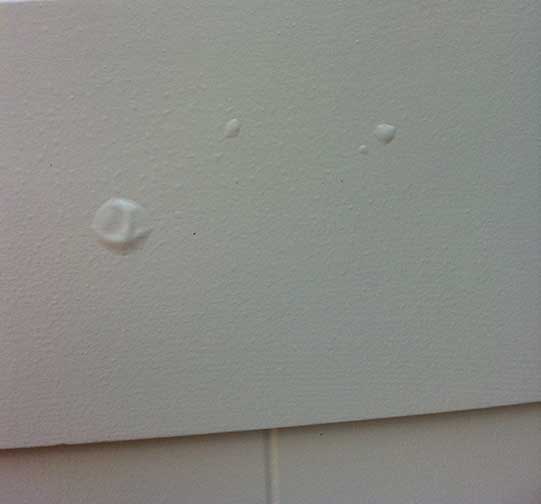
The cedar has a genetic code drawn from thousands of years in the temperate climate of the Pacific Northwest. It sits in the Prowell shop as inventory, which is more or less the same climate. when it ships to, say, Mississippi in August, the cedar goes through a transformation of figuring out what the hell is going on. This heat and humidity thing unlike anything it’s genetic code knows. So, it expands and contracts excessively for a few weeks as it gets accustomed to its new home. If it is finished prior to that with a layered type finish such as paint or solid-body finishes, or certainly varnish-style finish, these inflexible finishes often have trouble keeping up with the initial flexibility of the acclimating cedar and the result can be bubbles, as we see below. Under normal conditions, it’s best to allow the cedar to acclimate to your climate before applying–or non-absorbing– layered finishes.
Although paint and solid body stains are the longest lasting and most durable, they are not without risk: If you neglect their maintenance schedule, they will crack and check and even peel and leave you with the unappealing task of sanding prior to refinishing. This happens more so with a gate, fully exposed to the element, than, say, your house siding or front door, which are insulated on one face and covered by a roof.
COLUMNS
There is a specific, universal methodology to constructing a column. Commonly it begins with a steel post core as 4×4 or 6×6, set 32″+ into concrete, clad with cinder block that is seated into a shallow 4-6″ bed of concrete, which is clad in stucco, stone, brick, etc. Or a footing o f18- 24″ deep without the steel core and cinder block building off the footing, reinforced with re-bar set vertically through the block cavities and into the footing and the block cavities poured with concrete, and then clad with stucco, stone, brick, etc. Below we have a column bearing the whopping load of a gate weighing approx 65 lbs. The column is listing, simply sinking to the shifting soil. It cannot be fixed and must be razed and re-built.
COLUMNS
What can happen when there are double gates mounted to poorly built columns that list such that they are no longer plumb. Normally this will see the columns collapsing inward, so the gap between the gates is narrower at the top. Here the columns have simply given to the shifting soil substrate. For the sake of the gate’s lifeline, Prowell just assumes your columns were constructed properly.
READING A LEVEL??
Saving the best for last, and to also illustrate the various levels of competency existing in the trade. Sent in from
Peach Tree, Georgia as a testament to their finished installation, we’re left to wonder what they had put in their morning coffee.
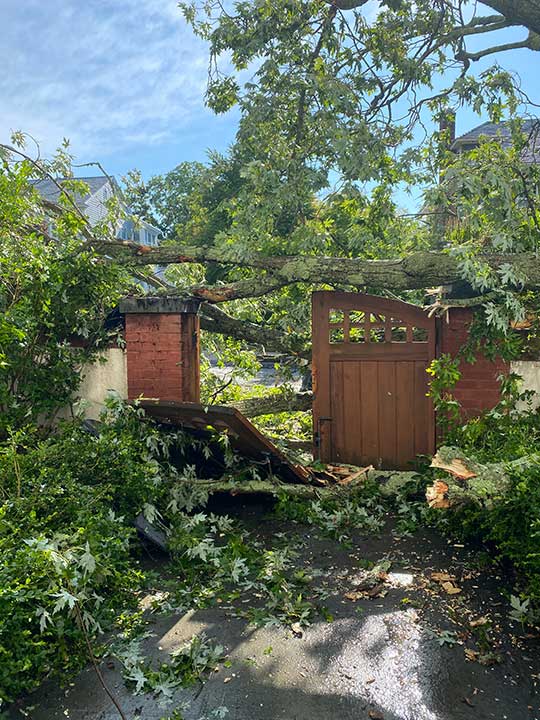
STORM FRONTS
The storm front of July 2020 along the Rhode Island coast felled a century old elm. Surprisingly, the gates suffered only superficial wounds.
OR . . . the importance of hiring an experienced tradesman
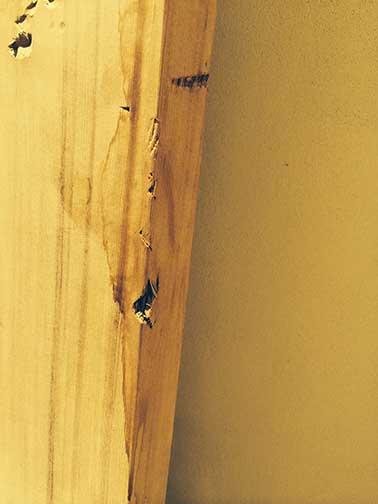
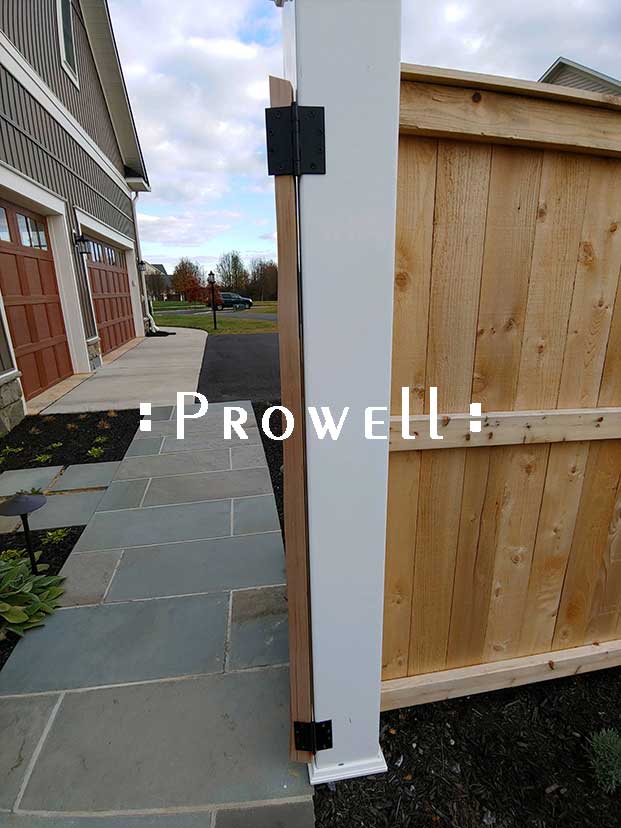
Don’t risk awakening one morning to find your gate sprawled across the lawn following an evening of high winds. Here we have an installer who neglected to read the install guides, or the list of common errors, and apparently no time to even glance at the drawings, all of which accompany the gate. The gate’s hinges are mounted as spread hinges, with the screws acting as potential wedges along the vertical grain of the hinge stile. But more . . .the wood stops accompanying each gate are not installed against the post, so the gate blows in the wind and closes beyond what the hinges allow and the result, eventually, is a cracked stile.
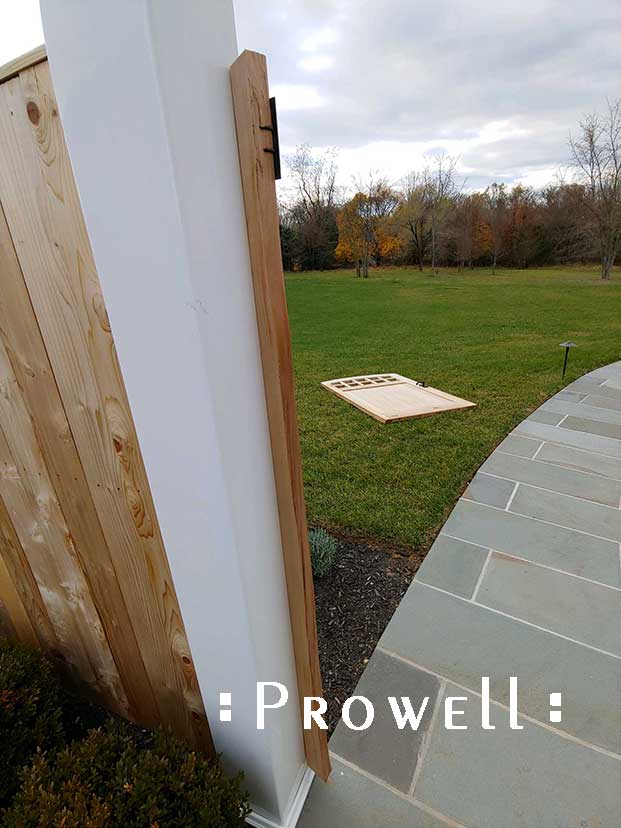
INCORRECT HINGE MOUNTING AND AN ABSENCE OF THE MOUNTED GATE STOPS
The stainless ball-bearing 4.5″ hinges Prowell recommends do not mount as shown. The hinge screws are meant to mount to the edge of the gate and post and not spread, as shown.
![]() AND LASTLY, the unthinkable: A pedestrian gate style #72 that was actually hung upside down! Granted, the #72 has no upper pattern or pickets to help distinguish right-side up, but three elements should be enough to always determine a gate’s orientation:
AND LASTLY, the unthinkable: A pedestrian gate style #72 that was actually hung upside down! Granted, the #72 has no upper pattern or pickets to help distinguish right-side up, but three elements should be enough to always determine a gate’s orientation:
1) The latch bore and does it match the preferred swing direction in the drawings
2) The bottom rail is always the wider rail.
3) The Prowell stamp is never on the top rail of the gate. Here the unseen stamp will be on the opposite face of the gate, on the top instead of the bottom.
JPEG SPECS
Wood Gate Stops
The following specifications are also available as PDF downloads on the above links along the left margin, as well as clicking on the images to download the pdf.
JPEG SPECS
JAMB-T0-MASONRY
JPEG SPECS
JAMB-T0-STEEL CORE

JPEG SPECS
JAMB-T0-STEEL CORE
JPEG SPECS
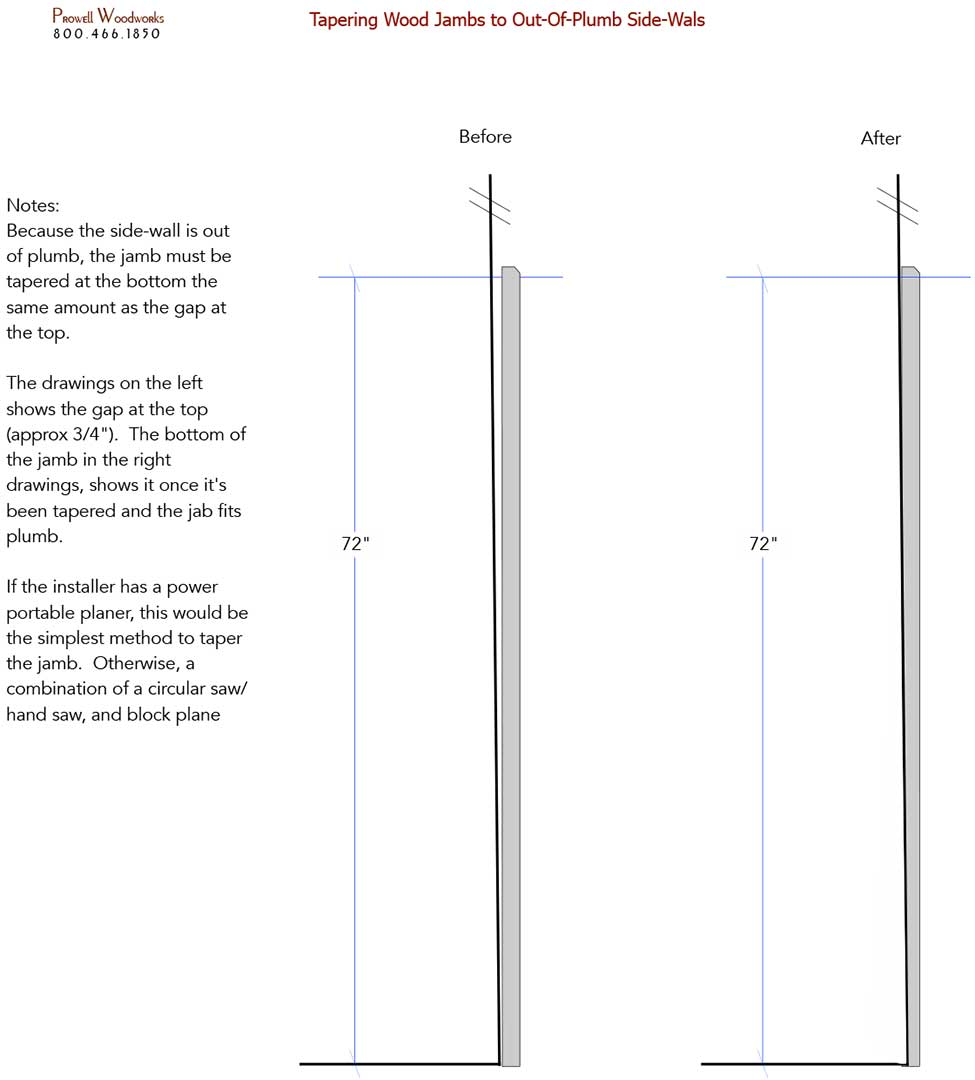
JAMB MOUNTING TO OUT-OF-PLUMB WALL
PRODUCT SPECIFICATIONS NAVIGATION
![]()